
Hello reader. Thanks for stopping by to read this article on actions, action lists and action managers. This isn't the most up to date version of the article, so I thought it might be useful to list out the different versions, just to be sure you were reading the one that suits your needs best:
If you find this article useful then please consider making a donation. It will be appreciated however big or small it might be and will encourage Brian to continue researching and writing about interesting subjects in the future.
Actions and action lists were introduced with Delphi 4 in June 1998 (in all flavours of the product) and were apparently considered so important that they were the first addition to the Standard page of the Component Palette since Delphi was released back in February 1995.
However it would appear that these potentially very useful components have been much under-used by the Delphi community. Maybe this is just because people don't know about them. Maybe the TActionList component should have been placed at the beginning of the Standard page rather than the end (if you have used Delphi 5 you may have noticed that the Frames selector was added at the start of the Standard page).
Anyway, for those who have never had the time or inclination to look into what actions do and how they work, this paper will explore their purpose, usage and internal operation. It also looks at the enhancements to the action architecture with the introduction of action bands and action managers in Delphi 6 (May 2001).
The paper closes with a look at how to install new, reusable actions into the IDE. Where possible, sample applications are provided twice, once using the VCL and once using CLX.
You can download the files that accompany this paper by clicking here.
Often in applications, there are several UI mechanisms to trigger the same functionality (or command). For example a button, a menu item and maybe a tool button on a tool bar or a speedbutton on a speedbar. Normally you set up this type of arrangement by sharing OnClick event handlers between the various objects. Of course you must set up the captions and various other properties of each control individually and this also applies when you need to disable all the controls that can invoke the command.
An action is a non-visual component that represents a user-generated command. It allows you to set up all the UI properties related to that command in one central place, along with the code required to execute the command and also code that can control if the command is available to the user or not. Actions are typically managed through action lists, which are also non-visual components in Delphi 4 and 5, Kylix 1 and C++Builder 4 and 5. Starting with Delphi 6, it will become more common for actions to be managed by an action manager (also non-visual).
You connect actions to various trigger controls which can invoke the action. The UI properties and command functionality are both automatically propagated from the action to these controls. If any property of the action is modified at any point, these changes are also propagated. So for example, if the action gets disabled at any point, all the related controls are disabled in turn. Code that controls whether the actions are available or not is automatically called during idle time, meaning that UI controls that can invoke the action are automatically enabled and disabled as appropriate.
The trigger controls that are designed to invoke the action's code are called action clients. The controls affected by the action are described as action targets or simply targets. Normally, when you create actions in the IDE you do not explicitly specify action targets (there is no place to do so). Instead, the action's code affects various action targets. We will see how action targets gain more significance later.
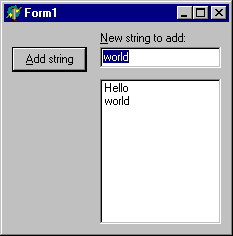
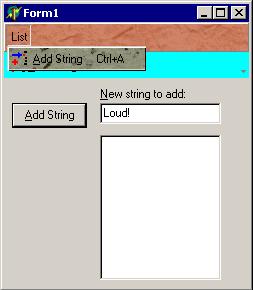
Let's try implementing a simple application a few times, firstly without actions in the normal way, then using actions. Hopefully, you will see that actions simplify the development of application functionality and the management of a smooth UI. The application has an edit control (edtEntry), a button (btnAddString) and a listbox (lstEntries), as shown in Figure 1. The button's job is to add the edit's contents into the listbox. However, it only does this if the edit control does not contain a blank string or a string already contained in the list.
Figure 1: The application without actions
The first attempts will be without actions. There are two approaches we can choose from. One is to implement the button's OnClick handler as shown in Listing 1. As you can see, the basic job of adding the text into the listbox is done here, as is the validation of whether to perform the job at all. In this case the button is always enabled, but sometimes pressing it has no effect.
Listing 1: Functionality and validation in one place |
In more complex situations it could prove advantageous to split the actual implementation of the job from the validation code, as in Listing 2. Here, the validation is performed when the edit content is changed, and also after adding a string into the list. Invalid input in the list is avoided by ensuring the button is disabled when invalid data is in the edit, which perhaps gives a more intuitive user interface (see Figure 1). However to achieve this, the button must also be disabled in the Object Inspector, since the edit will start its life empty. This code can be found in the ActionLessApp.dpr project in the files that accompany this paper (there is a VCL and a CLX version).
Listing 2: The functionality split from the validation
|
Figure 2: Prototype number 2
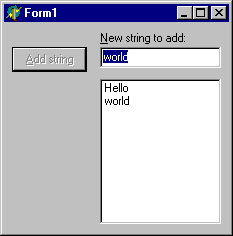
As you can see, the validation is almost automatic, but not quite. When the text is added to the list, the edit's OnChange event must be explicitly invoked to ensure that the button is disabled whilst the edit contains a string contained in the list box.
Now think about what would be needed if more controls could invoke the string adding behaviour. You would need to share the button's OnClick handler with all the other controls. You would also need to set the Enabled property of all the other controls in the edit's OnChange event handler. This would quickly get messy to manage and maintain. This is where actions become very useful, although they are just as appropriate when only a single control invokes some behaviour.
In order to rebuild this application with actions and see how things change, let's get some basic background first. The full details will be covered later.
Actions are managed either by action lists (TActionList components in Delphi 4 and later) or by action managers (TActionManager components in Delphi 6 and later). You can use as many action lists as you like, perhaps using multiple instances to keep actions in different logical groups. Each action list can be associated with a TImageList that contains small images that can optionally be used to represent each action. If you have an image list set up, use the action list's Images property to make the connection.
An action manager can act as a more functional action list, and can also link with existing action lists so that it can manage all actions in an application.
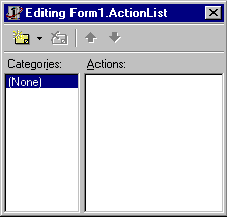
Once you place an action list on a form you can add actions using the Action List Editor available by right-clicking or double-clicking on it (see Figure 3). This allows you to create new actions and new standard actions (see later for details on standard actions).
Figure 3: The Action List Editor
Clicking the yellow button (or pressing Insert) makes a new action. Whilst selected, the Object Inspector can be used to set up the UI properties that represent the action. Figure 4 shows a new action with a number of properties including a shortcut key (ShortCut) and an index into the action list's image list (ImageIndex). Some of these properties were new in Delphi 6 (AutoCheck, GroupIndex, HelpKeyword, HelpType and SecondaryShortCuts) but the rest have been present since Delphi 4. The action's image is shown in the action list editor.
Figure 4: Editing an action's properties
One property that warrants description is Category. All actions in an action list have a category (a string) but normal actions default to having none. You can choose categories for each of your actions and the action list editor will list all categories in its left list box. When any given category is selected, only the actions from that category are listed in the right list box. As your use of actions increases, separating different actions into different action lists, and then having actions in a given list grouped by their categories, helps manage them.
The Object Inspector also allows you to set up a number of events for each action, the most important of which are OnExecute and OnUpdate. OnExecute should perform the job represented by the action. OnUpdate should verify whether the action is still valid.
Suitable action event handlers for an action that can work in our application are shown in Listing 3 (they can be found in the VCL or CLX ActionApp.dpr project that accompanies this paper). Notice that this time, unlike with Listing 2, the string adding code does not need to trigger the validation code. Instead it relies on the code being automatically called, which it will be (again, the details are coming).
Listing 3: Action event handlers
|
At this stage we have not specified any action clients, although the code implicitly identifies action targets of the edit control and list box. However, these are hard-coded in source and so do not quite fit the normal definition of action targets (more on action targets later).
At this stage we need a way to invoke the action. Normal procedure would involve adding action clients and connecting the action to them, but this is not strictly necessary. The action has already defined a shortcut (Ctrl+A). At run time, pressing Ctrl+A will automatically invoke the action if it is available (in other words is enabled), which frankly, is rather clever.
In this application though, action clients are required. Drop a button on the form and use the Action property to connect it to the only available action, actAddString. It will immediately absorb all appropriate properties and events from the action, which are Caption, Enabled, HelpContext, Hint, Visible and OnExecute (assigned to OnClick). These make the button look and behave sensibly. When the button is clicked, the action will be invoked.
Notice that the action's properties/events do not necessarily tie up with like-named properties/events in the client (for example, the action's OnExecute event handler is assigned to the button's OnClick handler). This allows more flexibility in associating actions with a whole variety of action clients.
If the default action client invocation mechanism is not suitable (say for example you want a control double-clicked to invoke the action, or the control has no Action property) this is no problem. You can either make the control's favoured event share the action's OnExecute event handler, if compatible, or alternatively make an explicit call to the action's Execute method in the control's event handler.
The action's OnUpdate event is regularly called during application idle time (full details later) and so if any of the validation conditions fail, the action's Enabled property is set to False. This change immediately propagates to the button causing it to become disabled, meaning that when the action is disabled the action client cannot trigger the action. The program running looks much like Figure 2 so another screenshot is pointless.
ActionApp2.dpr is another project, much like ActionApp.dpr except that a TBitBtn is used instead of a TButton (which allows a small bitmap to be rendered on its surface). Also, it employs a popup menu for the list box, a main menu and a toolbar with a toolbutton. You will not be surprised to learn that each of these controls is hooked up to the action to prove a point. The action's properties propagate to all the action clients (see Figure 5) and when the action is disabled, all the action clients instantly disable.
Figure 5: The application with actions
Also, these other controls use more of the action's properties. For example, when a TMenuItem in the Menu Designer is connected to the action, the ShortCut property is copied along with Checked, ImageIndex and GroupIndex. To make sure the menu item's ImageIndex had something to index into, both the popup menu and main menu were initially connected to the same image list as the action list.
In the case of a TToolButton, the action's Checked property value is copied to the Down property but most of the others go through to the correspondingly named property. Tool buttons also have an ImageIndex property so the toolbar was also connected to the image list in advance of connecting the toolbutton to the action.
One important point about a tool button is worth making. Having connected the toolbar to the image list, the first tool button added to the toolbar will automatically display the action's image. This is just coincidental. The first toolbutton gets an ImageIndex of 0 automatically, the second gets an ImageIndex of 1 and so on. The toolbutton will still need to be connected to the action like any other action client.
You should be able to see the main point of action components now. Being automatically validated they give a smooth, reactive user interface with consistency amongst controls that invoke the same functionality.
When writing shared event handlers in applications that do not use actions, it is common to use the Sender parameter as a means of identifying which UI control triggered the event, so that specific code can execute when some specified control triggers it. When using actions, the Sender parameter of the OnExecute event handler that is propagated around will be the action itself, not the UI control. Delphi 6 adds a new ActionComponent property to all actions, which is set to the action client just before OnExecute is fired, and set back to nil afterwards.
The final iteration of this project is ActionApp3.dpr. This is a VCL-only project as, at the time of writing, ActionBands have just been introduced in Delphi 6 and are restricted to the VCL. This project shows the more modern way of building up a UI like the one in Figure 5 taking advantage of ActionBands.
If you are using Delphi 6, you can dispense with action list components altogether and simply use an action manager, which allows you to create action components. However, in this case we will start from the position we were at with ActionApp.dpr and make use of the existing action list.
The new action components are sat at the end of the Additional page of the Component Palette. The TActionManager component is the enhanced action list replacement which we will use here. You can also find the two Action Band components, TActionMainMenuBar and TActionToolBar.
As you can probably guess, these are specialised versions of a menu bar and a tool bar respectively. They allow you to very easily set up the UI for your actions using a drag and drop approach between the action manager's customisation dialog and the action band components. The final component is TCustomizeDlg, which provides users with a runtime equivalent of the action manager's design-time configuration dialog, thereby making it very straightforward for users to customise their menu and toolbars.
To build our action application with the new components, proceed as follows. Drop a TActionManager on the form and connect it to the image list already on the form using its Images property. Double-clicking on the action manager invokes its customisation dialog where new actions can be added (amongst other features), but before we go there, we need to hook up to the existing action list component.
The property LinkedActionLists is a TLinkedActionListCollection object that represents a collection of references to action lists in your application. Press the button next to this property to invoke the collection editor and then either press the Insert key or the yellow button to add a TActionListItem item to the collection. The Object Inspector will show that this collection item has just two properties. The ActionList property allows you to connect it to the action list component, and the Caption property allows you to give it a user-friendly name, as shown in Figure 6.
Figure 6: Connecting an action manager to an existing action list
With this step done, you can double-click the action manager component top see its customisation dialog, where you can see all the actions defined in our action list (which amounts to a single action), as shown in Figure 7. At this point, it might be wise to specify a category for our sole action, to make things more intuitive later. Select the action in the action manager dialog, and on the Object Inspector set the Category property to List.
Figure 7: Seeing all the actions under the action manager's control
With the action manager prepared, it is time to add one of the action bands to the form. Get a TActionMainMenuBar from the Additional page of the Component Palette and place it on the form. To make the action manager fully aware of it, select the action manager component, then select its ActionBars property on the Object Inspector. Press the ellipsis button to bring up the ActionBars collection editor and press the Insert key to make a new ActionBar collection item. Use the ActionBar property to link it to your action menu bar component. However this step is actually not required, as the link will be made implicitly as soon as you start adding items to the Action Bar (action main menu bar or action toolbar) as described below.
To get an action-aware toolbar, you can pick a TActionToolBar from the Component Palette and use the same approach to tell the action manager about it. Alternatively, you can switch to the action manager dialog's Toolbars tab and press the New button. Note that this page of the dialog also allows you to customise the tooltip settings used on the toolbars, although at the time of writing there is a bug outstanding in this area, meaning the settings have no effect (though see later).
To set up the menu bar and the toolbar, drag the single action from the action manager dialog's Actions tab onto the toolbar. You can also drag the whole List category of actions onto the menu bar. This adds a List menu on the menu bar, with menu items for each action in the category hanging off it. Figure 8 shows the action main menu bar being used, thereby temporarily obscuring the action toolbar just below it.
Figure 8: An ActionBand in use
Making life easy for setting up menus and toolbars full of action clients is not the end of what Action Bands offer. You can customise the appearance of an action toolbar or any of its toolbuttons, as well as the main menu bar, and also each individual menu that hangs off it. For example, if you have an action menu bar with a File and a Help menu, you can customise the main menu bar, as well as the File menu and the Help menu.
The customisation on offer is quite impressive, matching the sorts of things Microsoft are doing in their own applications. You can change the colour or supply a background bitmap to start with, which can optionally be stretched or tiled. This bitmap can also be used as a banner, laid down the right side (of a menu for example) or up the left side (rather like the Windows Start menu). For example, Figure 9 shows the same application as before with the main menu bar and List menu with different background bitmaps, and the toolbar with a different colour.
Figure 9: Customised Action Bands
Setting up these modifications is straightforward as they are all attributes of the action manager's ActionBars collection items (TActionBarItem objects). Bring up the collection editor for the ActionBars property and select the top level action bar you are interested in. The Object Inspector will show you the properties you need to use, including Background, BackgroundLayout and Color. To get to individual menus or submenus, use the Items property, which is a TActionClients collection, containing TActionClientItem objects. This has a similar set of properties, including Items for going down to further levels.
Note that as well as Items, there is also a ContextItems collection property. You can add new items to this collection (using the collection property editor or the Object TreeView) and connect them up to any action you choose using the Object Inspector. These context items will automatically appear in a popup menu when you right click on the relevant Action Bar.
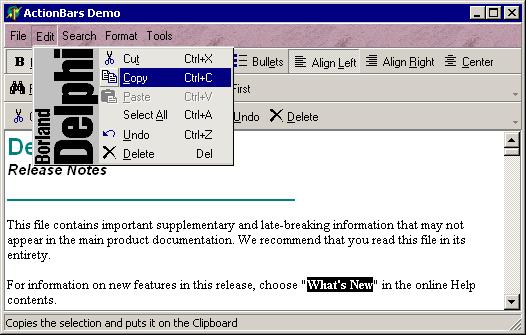
Figure 10 shows the Borland demo project for Action Bands with a modified menu bar and Edit menu. As you can see, it uses a bitmap as a left-hand menu banner and also uses a tiled bitmap as a menu bar background.
Figure 10: The Action Bands demo project with a menu banner bitmap
As well as supporting having their general appearance customised, ActionBand menus automatically keep track of the usage of their menu items (actually, this applies to all action client items, not just menu items). Much like Windows 2000 and Windows Me, they will hide little-used menu items, leaving the more frequently used items immediately available. The infrequently used menu items are simply hidden away, being accessible through a menu item with a double arrow on it (see Figure 11).
Figure 11: A menu with some items hidden through lack of use
Figure 12 shows what you get if you hold your mouse over that menu item, or click on it. Note that this usage support is automatic, and operates through a number of properties. To determine when to display or hide a UI element that is rendered by the action band for a specific TActionClientItem, the action manager maintains a count for each item of the total number of sessions it has been used in (TActionClientItem.UsageCount), the last session number it was used in (TActionClientItem.LastSession), and the current session number (TActionBars.SessionCount). The number of sessions is defined as the number of times the application has been launched.
This information is then tallied against a reference table, stored in the action manager's PrioritySchedule property. To determine if an item should be displayed, the program looks up the value of UsageCount in the left hand column in PrioritySchedule. The corresponding value in the right hand column is the number of sessions an item can be unused before it becomes hidden. If it has not been used in that many sessions, it becomes hidden.
Figure 12: All menu items are visible now
Setting the UsageCount property of a TActionClientItem to -1 will ensure it is always shown. To disable this facility altogether, clear all the values from the PrioritySchedule property.
It has been mentioned that the action manager dialog can be made available at runtime. This can be done in one of two ways. You can add a TCustomizeDlg to a form, set its ActionManager property appropriately and call its Show method. Alternatively you can use the pre-supplied TCustomizeActionBars standard action. We will look more at how standard actions are accessed and used in the next section.
As your users make modifications to their menus and toolbars using the customisation dialog, you will almost certainly want all their settings to be saved to disk between sessions. This is easily accommodated using the action manager's FileName property. When the application starts up, the action manager will read all the settings from the file, and when the application is being terminated, all the settings are written back to it.
There is a lot of nice functionality on offer in the ActionBands classes that evades observation on first glances. One example can be found in the ActionBars property, which is an object that manages all the action bar items. Recall that an action bar item links the Action Manager to an Action Bar and also manages the action client items on the Action Bars). Whilst the help doesn't directly mention it, there is a useful method called IterateClients available in ActionBars (inherited from the ancestor TActionClientsCollection class). This routine allows you to recursively execute a specified callback method against every action client item in a specified action client collection.
This means you can have code execute against every item that sits on an Action Bar connected to an Action Manager using simple code such as in Listing 4. IterateClients takes a TActionClientsCollection object (such as an Action Manager's ActionBars property) and proceeds to iterate through all the action clients (TActionClientItem or TActionBarItem objects) it finds. Note that it will locate action clients found in Items action client collections but does not look in the ContextItems properties.
Listing 4: Iterating over all action clients
|
If you take the time to browse through the ActionBands source you will find plenty of other goodies. You can get a good demonstration of all the general ActionBands options by opening up the demo project that come with Delphi, which can be found in Delphi's Demos\ActionBands directory. Figure 10 shows that demo running after I added a left banner image to one of the menus and a tiled background image to the menu bar as described earlier.
That's pretty much it as far as official ActionBands support goes, but Borland's Steve Trefethen (who wrote the official stuff) has some additional Actions and ActionBands support available from his Web site.
For starters he has a couple of demo projects that show some of the new standard actions in use. One shows the new list manipulation actions (that allow you to easily copy/delete/insert items in a list) and the other is more adventurous and uses every single new action (as well as the old ones).
With regard to ActionBands Steve offers examples that show how you can easily set up an MRU (most recently used) history list for recently opened files and how large icons can be used on an action toolbar. You can also download a handy TActionManagerHelper component that simplifies the job of navigating through all the action client items at runtime and overcomes the problem encountered when the user deletes items at runtime. It offers these methods for easy run-time ActionBand manipulation: AddAction, AddCategory, AddSeparator, DeleteActionItems, DeleteItem, FindItemByCaption and FindItemByAction.
There are also descriptions of a number of bugs that have been found by ActionBands users. VCL source fixes are offered although where possible they are incorporated in Delphi 6 Update Pack 2. Any fixes which require changes to the interface sections of units will not be put in any Update Pack (a standard policy) but Steve assures me that any such bugs (including the one that affects the tooltip options) will also be addressed on his site for you to fix yourselves.
Note that the ActionBands are not compiled into any of Borland's standard runtime packages, meaning that even if you use packages, you can still make VCL source changes to fix issues that may arise.
I've saved the best till last. The other ActionBands-related freebie you can get from Steve's site is a ZIP file containing updated Action Bar components to provide the menu/toolbar appearance as used by Microsoft Windows XP and Office XP (with the light blue square highlighting). It also offers the choice of using Microsoft Encarta style menus (all black)
The XP action toolbars are available as an additional TXPActionToolBar component that gets installed on the Additional page of the Component Palette. XP-style menus are attained by simply using the XPReg unit and Encarta menus require using the TwilightMenus unit (there is no Encarta action tool bar).
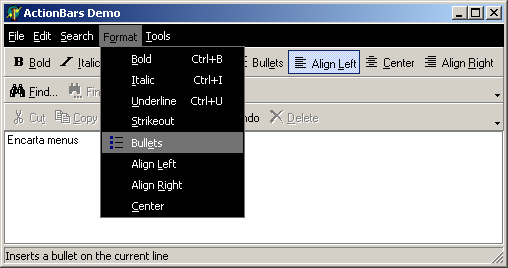
Figure 13 shows the updated version of the ActionBands demo project using an XP toolbar and XP-style menu. Note the little arrow at the end of the XP action toolbar? This is automatically drawn and allows straightforward customisation of the toolbar buttons as can be seen in Figure 14). Finally, Figure 15 shows the Encarta-style menu scheme.
Figure 13: XP-style menus
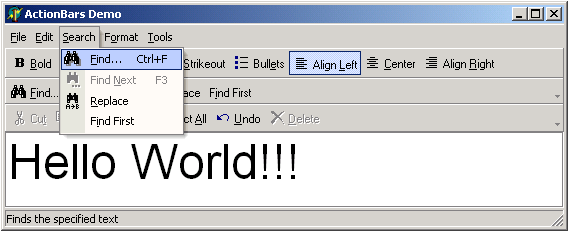
Figure 14: Automatic XP-style toolbar customisation

Figure 15: Encarta-style menus
The actions that we have been manually setting up are sometimes called custom actions, since the Delphi developer customises their behaviour and properties. Delphi also comes with quite a number of pre-defined actions with built-in behaviour and property values, which are referred to as standard actions, so named since their behaviour and attributes are supplied with Delphi as standard.
These standard actions provide commonly useful behaviour, such as clipboard interaction, MDI window commands and help commands. Table 1 shows the standard VCL actions that are supplied with Delphi 4, 5 and 6 and which versions introduced which actions. Delphi 6 and Kylix 1 also ship with a set of CLX actions that equate to the same as the VCL actions available in Delphi 5.
Table 1: Standard VCL actions available in Delphi
| Standard action class name | Introduced in | Defined in | Category | Purpose |
| TFileOpen | Delphi 6 | StdActns.pas | File | displays a file open dialog |
| TFileSaveAs | Delphi 6 | StdActns.pas | File | displays a file save as dialog |
| TFilePrintSetup | Delphi 6 | StdActns.pas | File | displays a print setup dialog |
| TFileRun | Delphi 6 | StdActns.pas | File | launches an application, or performs some other registered file operation |
| TFileExit | Delphi 6 | StdActns.pas | File | terminates the application |
| TOpenPicture | Delphi 6 | ExtActns.pas | Dialog | displays the open picture dialog |
| TSavePicture | Delphi 6 | ExtActns.pas | Dialog | displays the save picture dialog |
| TColorSelect | Delphi 6 | StdActns.pas | Dialog | displays the colour section dialog |
| TFontEdit | Delphi 6 | StdActns.pas | Dialog | displays the font edit dialog |
| TPrintDlg | Delphi 6 | StdActns.pas | Dialog | displays the print dialog |
| TEditCut | Delphi 4 | StdActns.pas | Edit | cuts highlighted text from the target to the Clipboard |
| TEditCopy | Delphi 4 | StdActns.pas | Edit | copy highlighted text to the Clipboard |
| TEditPaste | Delphi 4 | StdActns.pas | Edit | pastes text from the Clipboard to the target and ensures that the Clipboard is enabled for the text format |
| TEditSelectAll | Delphi 5 | StdActns.pas | Edit | selects all the text in the target edit control |
| TEditUndo | Delphi 5 | StdActns.pas | Edit | undoes the last change made to the target edit control |
| TEditDelete | Delphi 5 | StdActns.pas | Edit | deletes the highlighted text |
| TSearchFind | Delphi 6 | StdActns.pas | Search | displays a find dialog |
| TSearchFindFirst | Delphi 6 | StdActns.pas | Search | displays a find dialog that looks for the first string |
| TSearchReplace | Delphi 6 | StdActns.pas | Search | displays a find-and-replace dialog |
| TSearchFindNext | Delphi 6 | StdActns.pas | Search | locates the next instance of a string in an appropriate control |
| TRichEditBold | Delphi 6 | ExtActns.pas | Format | toggles the bold attribute of the currently selected text in a rich edit control |
| TRichEditItalic | Delphi 6 | ExtActns.pas | Format | toggles the italic attribute of the currently selected text in a rich edit control |
| TRichEditUnderline | Delphi 6 | ExtActns.pas | Format | toggles the underline attribute of the currently selected text in a rich edit control |
| TRichEditStrikeOut | Delphi 6 | ExtActns.pas | Format | toggles the strike-out attribute of the currently selected text in a rich edit control |
| TRichEditBullets | Delphi 6 | ExtActns.pas | Format | toggles whether the current paragraph in a rich edit control is bulleted |
| TRichEditAlignLeft | Delphi 6 | ExtActns.pas | Format | left-justifies the text in the current paragraph of a rich edit control |
| TRichEditAlignRight | Delphi 6 | ExtActns.pas | Format | right-justifies the text in the current paragraph of a rich edit control |
| TRichEditAlignCenter | Delphi 6 | ExtActns.pas | Format | centres the text horizontally in the current paragraph of a rich edit control |
| TWindowClose | Delphi 4 | StdActns.pas | Window | closes the active MDI child form |
| TWindowCascade | Delphi 4 | StdActns.pas | Window | cascades the MDI child forms |
| TWindowTileHorizontal | Delphi 4 | StdActns.pas | Window | arranges MDI child forms so that they are all the same size, tiled horizontally |
| TWindowTileVertical | Delphi 4 | StdActns.pas | Window | arranges MDI child forms so that they are all the same size, tiled vertically |
| TWindowMinimizeAll | Delphi 4 | StdActns.pas | Window | minimises all of the MDI child forms |
| TWindowArrange | Delphi 4 | StdActns.pas | Window | arranges the icons of minimised MDI child forms |
| THelpContents | Delphi 5 | StdActns.pas | Help | brings up the Help Topics dialog on the tab (Contents, Index or Find) that was last used |
| THelpTopicSearch | Delphi 5 | StdActns.pas | Help | brings up the Help Topics dialog on the Index tab |
| THelpOnHelp | Delphi 5 | StdActns.pas | Help | brings up the Microsoft help file on how to use Help |
| THelpContextAction | Delphi 6 | StdActns.pas | Help | brings up the help topic for the active control |
| TDataSetFirst | Delphi 4 | DBActns.pas | Dataset | sets the current record to the first record in the dataset |
| TDataSetPrior | Delphi 4 | DBActns.pas | Dataset | sets the current record to the previous record |
| TDataSetNext | Delphi 4 | DBActns.pas | Dataset | sets the current record to the next record |
| TDataSetLast | Delphi 4 | DBActns.pas | Dataset | sets the current record to the last record in the dataset |
| TDataSetInsert | Delphi 4 | DBActns.pas | Dataset | inserts a new record before the current record, and sets the dataset into dsInsert state so it can be modified |
| TDataSetDelete | Delphi 4 | DBActns.pas | Dataset | deletes the current record and makes the next record (if there is one, otherwise the previous record) the current record |
| TDataSetEdit | Delphi 4 | DBActns.pas | Dataset | puts the dataset into dsEdit state so that the current record can be modified |
| TDataSetPost | Delphi 4 | DBActns.pas | Dataset | writes changes in the current record to the dataset |
| TDataSetCancel | Delphi 4 | DBActns.pas | Dataset | cancels the edits to the current record, restores the record display to its condition prior to editing, and turns off dsInsert or dsEdit states if they are active |
| TDataSetRefresh | Delphi 4 | DBActns.pas | Dataset | refreshes the buffered data in the associated dataset by calling its Refresh method |
| THintAction | Delphi 4 | StdActns.pas | None | First documented in Delphi 6 as a way of displaying custom hints in the same way as done by TStatusBar.AutoHint. |
| TPreviousTab | Delphi 6 | ExtActns.pas | Tab | moves a page/tab control to the previous tab |
| TNextTab | Delphi 6 | ExtActns.pas | Tab | moves a page/tab control to the next tab |
| TListControlCopySelection | Delphi 6 | StdActns.pas | List | copies selected items in a list control (listbox or list view) to another list control |
| TListControlDeleteSelection | Delphi 6 | StdActns.pas | List | deletes all selected items in a list control |
| TListControlSelectAll | Delphi 6 | StdActns.pas | List | selects all items in a list control |
| TListControlClearSelection | Delphi 6 | StdActns.pas | List | deselects all items in a list control |
| TListControlMoveSelection | Delphi 6 | StdActns.pas | List | moves selected items in a list control (listbox or list view) to another list control |
| TStaticListAction | Delphi 6 | ListActns.pas | List | provides items to client list controls |
| TVirtualListAction | Delphi 6 | ListActns.pas | List | provides items to client list controls |
| TBrowseURL | Delphi 6 | ExtActns.pas | Internet | launches the default browser to display a specified URL |
| TDownLoadURL | Delphi 6 | ExtActns.pas | Internet | saves contents of a specified URL to a file |
| TSendMail | Delphi 6 | ExtActns.pas | Internet | sends an email message |
| TCustomizeActionBars | Delphi 6 | BandActn.pas | Tools | causes the Action Bands customisation dialog to appear |
You create standard actions from either the action list editor or the action manager's customisation dialog. However, instead of pressing the yellow button, you should drop down the arrow next to it and choose New Standard Action... from the drop down menu (or press Ctrl+Insert). This takes you to a dialog that lists all available standard actions (see Figure 16).
Figure 16: The standard action choice dialog
Assuming you have an image list associated with your action list, when a standard action is created it will add its associated image into your image list and set its ImageIndex property to the position of it, assuming it has one. It also sets up its other property values to pre-defined values (see Figure 17).
Figure 17: Instances of each of Delphi's standard actions
Some of these standard actions have an additional property that can be used to specify a dedicated target control. For example, all the dataset actions have a published DataSource property that appears on the Object Inspector. You can optionally use this property to connect the actions to one specific data source component but, again, this is not required. If you leave the property blank, the magic of action handling will allow the action to find the first data source on the active form at run-time.
Similarly all the standard edit actions have a public Edit property and the standard window actions have a Form public property. You can therefore programmatically tie an edit action to a fixed edit control, or a window action to one specific form. But if you do not, the edit action will act on the active edit control (if there is one) and the window action will act on the active MDI form (if there is one).
In Delphi 6, some action components manage their own extra components on your behalf, without requiring you to set up your own. For example, the TFileOpen standard action shown selected in Figure 17 manages its own internal open dialog component, whose properties you can see by expanding its Dialog property.
There are a lot of classes associated with actions and so, rather than simply listing them out, I will try and give an overview that encompasses them all. If you have no desire to know more about the internal workings of actions or of how to make reusable standard actions, you should perhaps skip the rest of this article. It is dirty-hand territory from here on in.
The action class hierarchy (see Figure 18) starts with TBasicAction (see Listing 5) which can be used in conjunction with an action client that is neither a menu nor a control. TContainedAction adds support to allow an action to appear in an action list. It also adds the Category property to allow actions to be categorised. TCustomAction adds the UI properties that can be propagated to action clients such as menus and controls, although it has no published properties. TAction publishes all the interesting properties of TCustomAction.
Listing 5: The TBasicAction base action class
|
Figure 18: The action class hierarchy
You will notice that THintAction is also sitting in the hierarchy (and was listed in Table 1). This class has been around since Delphi 4, but was first documented in Delphi 6. You can use THintAction to display component hints as the mouse moves around a form. TStatusBar uses this approach in order to implement its AutoHint property.
Whilst apparently changing the subject, but not really, I will talk briefly about data aware controls. Data aware controls and data source components appear to be directly connected through the data aware controls' DataSource property. However this is not actually the case. Instead, data link objects are employed in any data aware control that implements a DataSource property to act as the liaison officer, represent the link to the dataset and to respond to data events. Similarly, action clients that implement an Action property use action link objects to connect action components to their properties (such as Caption, Hint and ShortCut).
Action links exist as various classes in a mini-hierarchy (see Figure 19) with TBasicActionLink at the root (see Listing 6). This class takes the client object as a constructor parameter (although it does not store it) and the related action is available as the Action property. It sets up the basic structure of a connection between an action and a clients. It defines virtual Execute and Update methods which call the associated action's Execute and Update methods. If the action has an OnExecute event handler, Execute returns True and if it has an OnUpdate handler, Update returns True. It also has an OnChange event triggered when the properties of the action change.
Figure 19: The action link class hierarchy
Listing 6: The TBasicActionLink base action link class
|
TActionLink adds in basic support for managing the connection between an action's properties and the action client properties (see Listing 7). It has elementary support for Caption, Checked, Enabled, HelpContext, Hint, ImageIndex, ShortCut and Visible. The IsXXXXLinked methods all return True if Action has been assigned a TCustomAction or descendant whilst the SetXXXX methods do nothing. A TActionLink can be used as a base class for an action link that can be used when the action client is neither a control nor a menu (which are catered by descendant action link classes).
Listing 7: The TActionLink class
|
TMenuActionLink adds specific support for menu item clients by overriding AssignClient (which stores the client in a private data field) and IsOnExecuteLinked from Listing 6 as well as all the virtual methods in Listing 7. This allows actions to map their UI properties to equivalent menu item properties. TControlActionLink does a similar job for generic controls, although it only deals with Caption, Enabled, Hint, Visible and OnExecute (which maps to the client's OnClick event).
The other action link classes add support for various other specific properties of their indented client controls. For example TToolButtonActionLink works with tool buttons, adding a link between the action's Checked property and the tool button's Down property (note the difference in name).
Being aware of action links and how they fit in is generally useful, however getting down to the nitty-gritty of how they operate is only important if you wish to write interesting new components with new properties which you want controlled by actions. Given that we will not be covering that subject in this article, it is safe to leave action links alone now.
Now that we have seen the basic use of actions and had an overview of the classes involved, let's look in more detail at how they work inside a Delphi application. On our travels you will see that the Borland developers have provided many points that can be used to hook into action functionality. The execution path of actions presented here will be quite detailed, to give a full understanding of what goes on.
Action is defined as a public property in TControl (it is published by a number of descendant classes) and a published property in TMenuItem. When you assign an action component to an action client's Action property the following sequence of events occurs.
In the case of a control, csActionClient is added to its ControlStyle set property. Then, all action clients check if their protected ActionLink property refers to an action link object. If not, it creates an action link using the class reference returned by the protected dynamic GetActionLinkClass method. This returns an appropriate action link class of which an instance is created.
The action link is given the action object and its OnChange event is handled by an action client method that copies the key action properties to the action client properties. Since the action has just been set, this routine (a protected dynamic procedure called ActionChange) is triggered to get the current action properties copied across. At this point, the client has got the action properties and an appropriate action link object.
Now we need to see what happens when an action is invoked. Remember this can happen by an action client invoking it, such as a button being clicked, or by any piece of code calling the action's Execute method. It can also happen by the user pressing the shortcut key associated with an action, which need not be connected to any action client. By the end of this section we should be able to see how each of these possibilities works.
We start by taking the case of an action client invoking the action, using an example of a button hooked up to an action. When you look at a button set up as an action client you can see the Object Inspector showing the OnClick event connected to the action's OnExecute event handler. You might therefore understandably think that clicking the button will simply call the action's OnExecute handler. But it is not as simple as that. Oh no.
Instead, assuming the OnClick event has not been changed, the action link's virtual Execute method is called (see Listing 8) with a parameter equating to the action client (this becomes the action's ActionComponent property for the duration of the OnExecute handler). The default implementation of this in TBasicActionLink (which is not overridden in any of the descendant classes) calls the action's dynamic Execute method. So at this point the action client invoking the action now looks just the same as the some code explicitly invoking an action by calling the Execute method.
Listing 8: The implementation of TControl.Click
|
The base action class implementation of Execute tries to call the action's OnExecute event handler. Both Execute methods return True if the handler exists and False if not. However TContainedAction overrides Execute to perform more interesting logic. Since contained actions can be managed by action lists, they broaden the potential for response to an action by a wide margin.
Firstly, the action defers to its action list (if it has one) by calling its ExecuteAction method and passing itself as a parameter. The action list's ExecuteAction method is implemented to calls its OnExecuteAction event handler if present. If the event handler sets its Handled parameter to True, the story ends here. Otherwise it goes further. Notice that all the actions in an action list will trigger the action list's OnExecuteAction event handler and so some generic handling or action tracking can be implemented there if needed.
Next, the Application object's OnExecuteAction event is triggered if present. Similarly, if the Handled parameter is set to True, processing ends there, otherwise it carries on. Note that the Application object's OnExecuteAction event will be triggered for all actions in the application that are not handled by their corresponding action list, providing an option for completely general action handling, or alternatively a way to intercept all actions not handled by their action list.
If the action still has momentum, it at last tries to execute its own OnExecute event handler. If no handler was set up, which will be the case for standard actions, it goes still further. It packages itself up in a CM_ACTIONEXECUTE message which gets sent to the Application object's window as a cry for help in trying to find a target to execute against. The Application object's message handler calls its DispatchAction method which tries to locate a target on the active form and, failing that, the main form.
It does this by sending the same message to each form in turn, assuming it exists. The form then verifies that it is visible and if so, tries to find a target control. Firstly, it checks whether the active control is a suitable target by passing the action object to the control's ExecuteAction method. If not, the form itself is tested to see if it might be a target, passing the action to its own ExecuteAction method. If there is still no joy it calls ExecuteAction for every visible control on the form, stopping if it finds a match.
The implementation of a component's ExecuteAction method typically involves the component passing itself to the action's HandlesTarget method. If this returns True, we have a suitable target and so the target is passed to the action's ExecuteTarget method.
This way, an action target can be found for an action without the target knowing anything about the action in advance. However, ExecuteAction can be overridden to allow any control to pick up specific actions of interest, if needed, without the action knowing about the target. It works both ways.
If the main form does not successfully handle the message then the final step is reached. If the action is a TCustomAction (or inherited from that class), is currently enabled, has no OnExecute handler and its DisableIfNoHandler property is True, then the action is disabled. DisableIfNoHandler is a public property defined by TCustomAction which defaults to True.
TCustomAction also overrides this Execute behaviour from TContainedAction to call the virtual Update method to update the action's state before setting off on the possibly lengthy trek to execute the action. This ensures the action's state is up-to-date based upon the immediately current state of the application before being executed.
The case we have not looked at yet is where an action's shortcut key is pressed, causing the action to be invoked, regardless of whether an action client has been set up or not. Whenever a keystroke is pressed and is not handled by the active control or a suitable popup menu item, it is passed to the underlying form's IsShortCut method.
The form tries to handle the keystroke through its OnShortCut event or, failing that, through its main menu. If nothing wants it, all action lists owned by the form are checked for a matching shortcut. The action list checks each of its actions and if a match is found, the action's Execute method is called.
If no suitable action is found on the current form a CM_APPKEYDOWN message is sent to the Application object which calls its own IsShortCut method. This tries to handle the keystroke in its own OnShortCut event and if that fails it calls the main form's IsShortCut method.
This way a shortcut key can be picked up by an action on the active form or the main form, assuming a menu item or OnShortCut event does not handle it first.
As you can see, the VCL goes to a lot of trouble to service actions if they do not have an OnExecute event or even an action client, which standard actions tend not to. It is this concerted search effort that enables standard actions to work without necessarily being connected to an action client. They can typically operate on the active control (or some other suitable control) on the active form thanks to the VCL's in-built target-searching logic.
As mentioned, TCustomAction updates an action just before trying to execute it. However, they also get updated at another time. When an application has processed all of its pending messages it transitions into an idle state. Windows wakes it up when another message arrives. Just before going idle the Application object's Idle method calls its OnIdle event handler and then calls the DoActionIdle method.
DoActionIdle loops through all enabled forms on-screen calling UpdateActions, which calls the virtual InitiateAction method for itself, all top level, visible menu items and then all visible controls with csActionClient in ControlStyle (in other words all action clients). InitiateAction calls the Update method of the action link, if there is one which calls the action's Update method.
The TBasicAction implementation of Update either calls OnUpdate if it exists and returns True, otherwise it returns False. TContainedAction overrides Update to do much the same sort of thing as with Execute. It checks to see if the action list or Application object wishes to deal with updating the action in their OnUpdateAction events. Then it tries its own OnUpdate event handler. If there is no handler it asks the Application object to help find a target control to update itself against.
The action is passed to each possible target's UpdateAction method which calls HandlesTarget. If the action claims to handle the target then the action's UpdateTarget method is called.
This all means that every time a user's input (key presses, mouse clicks, and so on) have been serviced and the program goes idle waiting for the next message, all actions connected to action clients are updated. Consequently, this means that the action clients always have an up-to-date representation of the action properties. Additionally, all actions (regardless of whether they are connected to clients or not) are updated just before they execute.
Because the CPU is so fast, the application will go idle between each key press and mouse click meaning that actions are updated very regularly. The implication of this is that you must ensure your action update code is not time-intensive to avoid having a sluggish application.
We have seen how to make custom actions and how to use standard actions, so now we turn our attention to making new standard actions of our own. The general idea is fairly straightforward although there are a few twists and turns here and there.
The goal is to inherit a class from TAction and override three methods. HandlesTarget decides whether we handle a given target control. UpdateTarget should check appropriate criteria and update the action properties if needed. ExecuteTarget contains the code represented by the standard action. These methods have all been mentioned before and are all defined as virtual in TBasicAction where they do nothing except HandlesTarget, which returns False, indicating nothing is handled.
If needed, the action can define a property to link it to a specific target component. If this is done you must be careful to hook into the standard notification mechanism so you are informed if the linked component is destroyed.
The standard action we will develop will be called THelpAbout and will invoke an application About box. It will have a public property that allows it to be connected to any form class in an application, which will be displayed modally as the About dialog. Now, the job of this action is clearly not too ambitious; it can readily be done in program code. However, wrapping functionality like this into an action means that it can easily be invoked from both a menu and a toolbutton.
Incidentally, the reason the property allows connecting to a form class, rather than a form object is so that the About form does not have to be auto-created, or programmatically created in advance. The action can create the About form, display it and then free it. This also means that unlike when connecting to an object, we will not need to hook into the notification system to spot if the form gets destroyed behind our back.
Also, the reason this property is public rather than published is that the Object Inspector does not display class reference properties. Note that if this property has not been assigned a form class, the action will use the standard Windows About box, as used by Windows Explorer, Notepad, Calculator, etc. Listing 9 shows the action's code.
Listing 9: The common base class for the standard actions
|
This code can be found in AboutAction.pas, which has been added into the AboutAction40.dpk, AboutAction50.dpk and AboutAction60.dpk run-time packages for use with Delphi 4, 5 and 6 respectively. Don't forget to place the compiled package (the BPL file) in a directory on the path to allow Delphi to see it.
Apart from initialising its properties, the action is now ready to be registered. Typically, components perform property initialisation in their constructors. This would work fine for this action as well except for its associated image.
You may recall that standard actions can copy their image into the image list associated with their action list at design-time (see Figure 17 for a reminder). In order to allow our action to be just as friendly, we initialise its properties (image index, shortcut and so on) in a different way to normal components.
To register standard actions in the IDE, you call RegisterActions passing a category, a list of action classes and optionally, a data module class. The data module is used to pre-initialise the action properties and image. It works like this.
You make a data module, then drop an image list onto it, which you fill with images for your standard actions. Next, you place an action list on the data module and hook it up to the image list. The idea is that you then use the Action List Editor to create instances of your new standard actions, whose properties you can initialise as you like. This data module class is then passed as the third parameter to RegisterActions.
However, if you think about this, in order to get your standard actions created through the action list editor they must first be registered so the IDE knows about them. So what we can do is ignore the data module issue to start with and register the action on its own (we can worry about the data module later).
This is done with a normal IDE registration routine in a registration unit (AboutActnReg.pas), as shown in Listing 10. Notice that nil is passed in place of the data module class. The registration unit is added to a design-time package (DCLAboutAction40.dpk, DCLAboutAction50.dpk or DCLAboutAction60.dpk) which is compiled and installed.
Listing 10: First time registration of an action
|
At this point the IDE knows about the new standard actions so the data module can now be set up. A suitable data module called AboutActionModule is in the unit AboutActionRes.pas, which should be added to the design-time package. The image list can now be set up to contain appropriate images and the action list can be added and connected to it.
The Action List Editor can now be used to create an instance of our new standard action, and its properties can be set as required. Figure 20 shows the action fully set up on the data module, with all its custom properties on the Object Inspector.
Figure 20: New standard actions being set up
Now all that is left is to modify the registration routine in the design-time package to refer to the data module class. Listing 11 shows the final version. One final compile of the design-time package and the job is done. A new fully-fledged standard action is available for use.
Listing 11: Registering the actions
|
You are now free to make a new application using this new standard action to test it out. A sample project accompanies this paper called AboutActionTest.dpr and can be seen running in Figure 21.
Figure 21: A hand-crafted standard action in use
The application has set the Application object's Title property to some descriptive string (SuperApp by Oblong) and you can see how this affects the Windows About dialog, used because I have not given the action a specific About box form class, in Figure 22.
Figure 22: The about action doing its thing
Note that these steps have also been followed for a new action in the CLX framework. The action is called TCLXHelpAbout, defined in the CLXAboutAction.pas unit. This unit has been added to the CLXAboutAction60.dpk package, whilst the action is registered in the DCLCLXAboutAction60.dpk package through the CLXAboutActionReg.pas unit and the data module in the CLXAboutActionRes.pas unit.
The action is identical in all respects except that it does not call the Windows About box (that API will not be available in Kylix on Linux). Figure 23 shows a test program that has assigned the class type of an about box form to the new standard action's AboutClass property.
Figure 23: Testing the new CLX standard action
Actions represent a very convenient and manageable way to implement user-driven functionality that can be invoked in a variety of ways. Whilst currently under-used by many developers, hopefully as more people become aware of their power and benefit, they will become more commonplace in Delphi application development, particularly with the introduction of the innovative Action Bands component in Delphi 6.
This paper was based on an article of mine called Actions and Action Lists
that appeared in Issue 61 (September 2000) of The
Delphi Magazine. This paper represents a substantial update of that article
as it now discusses all the action changes that were introduced in Delphi 6,
including new standard actions and the new ActionBands components, and also
shows that actions can be used in CLX applications as well as VCL applications.
Brian Long used to work at Borland UK, performing a number of duties including Technical Support on all the programming tools. Since leaving in 1995, Brian has spent the intervening years as a trainer, trouble-shooter and mentor focusing on the use of the C#, Delphi and C++ languages, and of the Win32 and .NET platforms. In his spare time Brian actively researches and employs strategies for the convenient identification, isolation and removal of malware. If you need training in these areas or need solutions to problems you have with them, please get in touch or visit Brian's Web site.
Brian authored a Borland Pascal problem-solving book in 1994 and occasionally acts as a Technical Editor for Wiley (previously Sybex); he was the Technical Editor for Mastering Delphi 7 and Mastering Delphi 2005 and also contributed a chapter to Delphi for .NET Developer Guide. Brian is a regular columnist in The Delphi Magazine and has had numerous articles published in Developer's Review, Computing, Delphi Developer's Journal and EXE Magazine. He was nominated for the Spirit of Delphi award in 2000.