
Debugging With More Than Watches And Breakpoints
(or How To Use The CPU Window)
If you find this article useful then please consider making a donation. It will be appreciated however big or small it might be and will encourage Brian to continue researching and writing about interesting subjects in the future.
This paper will look at some options available for debugging Delphi and Kylix applications that are not well used by many Delphi developers. This is perhaps because these techniques involve, in many cases, knowledge of implementation details of various ObjectPascal language constructs, and familiarity with assembly language, to one extent or another. The fact that many Delphi/Kylix developers are not familiar with such low-level language and machine details could be related to the fact that many of these developers have a history of using 4GLs, high-level database languages, or even Turbo Pascal. Users of such tools will often not have experience of issues at the implementation level or machine level.
Delphi 6 will be assumed as the working environment throughout this paper, however if anything mentioned is not available in earlier versions, this will be pointed out in the text. Additionally, the compiler optimisation option is assumed to be disabled for any disassembly that might be displayed. This makes the code more straightforward to analyse, without need to concern ourselves with how the optimiser may chop and change the code around. Finally, runtime packages, DLLs or Linux shared libraries are assumed to be out of the picture as well, as they add in extra levels of indirection that are not discussed in this paper.
Delphi has always had a rich variety of debugging facilities. Delphi 1 had the traditional 3rd Generation Language (3GL) offerings, including single-stepping (executing individual source lines one at a time, optionally executing whole subroutines as one statement), watches (sometimes referred to as watchpoints) and breakpoints (which can have an associated condition or pass count). Some viewing windows (for watches, breakpoint properties and a function call stack) and an evaluate-and-modify area completed the set.
We won't be looking at these normal debugging facilities in any detail as most Delphi developers are quite at home using them. Instead, we will be focusing on some of the lesser known and more scarcely used areas.
The set of debugging tools remained mostly unchanged when Delphi first went 32-bit with version 2, apart from the ability to view additional execution threads in your process in a Thread window.
Version 3 added (well, almost added) the CPU window to the set (as well as the modules window), but as it was not quite finished it had to be enabled with an undocumented option. This involved using the registry editor (REGEDIT.EXE) to add a new string item in Delphi 2 or 3's Debugging key called EnableCPU and giving it a value of "1" (it defaults to a value of "0"). This enables a new CPU Window menu item on the View menu. Note that the result in Delphi 2 is pretty unusable, whereas the Delphi 3 version was getting closer to fully working.
Despite being fully available in Delphi 4, 5 and 6, as well as in Kylix 1 (and the historically popular standalone Turbo Debugger), the CPU window is not very well understood and developers often shy away from it. This is unfortunate because, when used well, it can prove to be one of the most direct and powerful debugging aids for the developer.
Unfortunate it may be, but it is understandable, as the first thing you see when opening the window is a lot of assembly instructions. This tends to makes the average ObjectPascal developer run and hide. In order to help make the window more approachable, we will have a quick run through of some of the basics of assembly instructions that will hopefully set us in good stead to use this window to good effect.
Nobody who writes Windows applications writes them solely in assembly (at least, no one who wants to be productive). Assembly programming is one step away from machine code programming. Assembly programming involves using recognisable mnemonics instead of the resultant numeric opcodes, and each assembly statement corresponds to exactly one machine instruction. Any high level programming language allows you to write higher level abstractions of logic using a given dictated syntax, and the compiler then expands this out to the resultant machine code in your generated executable.
However despite the compiler's optimising nature, sometimes some key logic that may get called a significant number of times may be better written in assembly for efficiency. Various parts of the Delphi Run-Time Library (RTL) have been historically written in assembly to aid execution efficiency (although much of this has been re-written in ObjectPascal to aid portability to Linux). To a lesser extent, occasional routines (or portions of them) in the Visual Component Library (VCL) are also hand-written in assembly.
Apart from the business of writing assembly code, which does not concern us here, knowing a smattering of assembly is most useful when debugging in Delphi as it allows you to understand (at least partially) what is presented in the CPU Window.
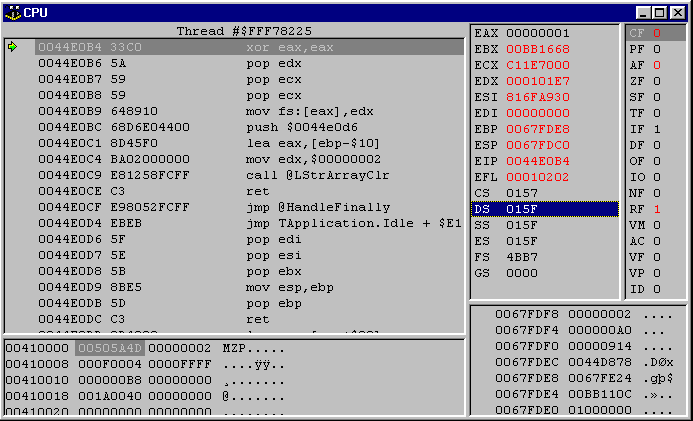
Figure 1: The CPU Window
Figure 1 shows the CPU Window as it normally appears. It shows itself under three circumstances:
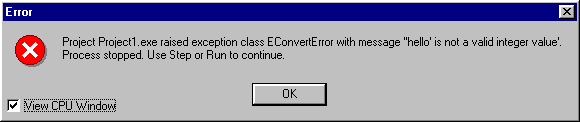
Figure 2: When an exception is picked up, you have the option of seeing the CPU window
There are five parts of the CPU window, as can be seen in Figure 1. Starting at the top left, going clockwise, these are:
You can navigate around these panes in one direction using Tab or Shift+Tab for the other direction.
Registers are special memory locations (with no address) that the CPU can access very efficiently. They are either 8-bits (Byte), 16-bits (Word) or 32-bits (DWord) in size, although the 8-bit registers are just individual bytes of the some of 16-bit registers. Some of the 16-bit registers are just the low words of some of the 32-bit registers. Assembly instructions often operate in conjunction with registers to move information around, or to modify it.
The most commonly used registers are 32-bits and are prefixed with the letter E for extended. This is to distinguish them from their 16-bit counterparts. For example, the 32-bit EAX register is an extended version of the 16-bit AX register. Table 1 lists all available registers with some information about them.
Table 1: CPU registers
| Register | Register name | Size | Comments |
| Extended accumulator | 32 bits | General purpose register | |
| Extended base | 32 bits | General purpose register | |
| Extended count | 32 bits | General purpose register | |
| Extended data | 32 bits | General purpose register | |
| Extended source indicator | 32 bits | General purpose register | |
| Extended destination indicator | 32 bits | General purpose register | |
| Extended base pointer | 32 bits | General purpose register | |
| Extended stack pointer | 32 bits | General purpose register | |
| Extended instruction pointer | 32 bits | Status/control register | |
| Extended flags | 32 bits | Status/control register | |
CS | Code segment | 16 bits | To hold a segment selector |
DS | Data segment | 16 bits | To hold a segment selector |
SS | Stack segment | 16 bits | To hold a segment selector |
ES | Extra segment | 16 bits | To hold a segment selector |
FS | Another extra segment | 16 bits | To hold a segment selector |
GS | Another extra segment | 16 bits | To hold a segment selector |
| Accumulator | 16 bits | Low word of EAX | |
AH | Accumulator high | 8 bits | High byte of AX |
AL | Accumulator low | 8 bits | Low byte of AX |
| Base | 16 bits | Low word of EBX | |
BH | Base high | 8 bits | High byte of BX |
BL | Base low | 8 bits | Low byte of BX |
| Count | 16 bits | Low word of ECX | |
CH | Count high | 8 bits | High byte if CX |
CL | Count low | 8 bits | Low byte of CX |
| Data | 16 bits | Low word of EDX | |
DH | Data high | 8 bits | High byte of DX |
DL | Data low | 8 bits | Low byte of DX |
Not all these registers can be directly modified. For example, EFL contains a number of flag bits which are modified individually by various machine instructions that execute (see below). Also, EIP points to the instruction being executed. This is modified implicitly by jump and return instructions. You can see the address in EIP being indicated by a green arrow in the disassembly pane (top left) in Figure 1.
The 32-bit registers often contain a memory address (as memory addresses in 32-bit Windows are also 32-bits). A reference to the register (e.g. EAX) returns that address, whereas a reference to the address in square brackets returns the data at that memory location (e.g. [EAX]). This makes it easy for registers to be used as pointers.
Some registers are described with a specific intention, for example ESI and EDI are described in terms that suggest they are used to point to the source and destination address for data movement operations. This intention may well be true, but there are generally no hard and fast rules for when certain registers should be used.
Because registers are so much more efficient than normal memory, optimising compilers such as those in Delphi and Kylix try to use them wherever possible, rather than storing things in conventional memory.
Various machine instructions modify various internal CPU flags, which are all maintained in the EFL register. Table 2 shows the flags available in 32-bit mode and also shows the bit positions in the EFL register that represent the flag. All the other bits in the EFL register are reserved and remain set to zero.
Table 2: CPU Flags
| Value | EFL register bit(s) | Flag/bit name | Flag type |
CF | 0 | Carry flag | Status |
PF | 2 | Parity flag | Status |
AF | 4 | Adjust flag | Status |
ZF | 6 | Zero flag | Status |
SF | 7 | Sign flag | Status |
TF | 8 | Trap flag | System |
IF | 9 | Interrupt flag | System |
DF | 10 | Direction flag | Control |
OF | 11 | Overflow flag | Status |
IO | 12 and 13 | I/O privilege level field | System |
NF | 14 | Nested task flag | System |
RF | 16 | Resume flag | System |
VM | 17 | Virtual 8086 mode flag | System |
AC | 18 | Alignment check flag | System |
VF | 19 | Virtual interrupt flag | System |
VP | 20 | Virtual interrupt pending flag | System |
ID | 21 | Identification flag | System |
Typically, only the status and control flags are of interest in most applications, but the system flags are included for completeness. The Flags pane shows all these flags.
An Intel machine code reference manual will explain the purpose of each flag (see Reference 1) and detail which flags are modified by which instructions (References 1, 2 and 3). Just to give the idea though, if an arithmetic operation causes an unsigned value to overflow the maximum 32-bit unsigned value, the overflow flag will be set.
Various assembly instructions will jump to locations or perform other operations based on the state of specific flags.
The CPU stack is a first-in, last-out area of memory that can be used to store information temporarily. ESP is the stack pointer register that points to the last item pushed on the stack. When an additional item is pushed on the stack, ESP is decremented by an appropriate number of bytes and the data item is copied to where ESP points to. The stack therefore fills up starting from higher memory addresses and moves down towards lower memory addresses.
The stack is also used as a mechanism to pass parameters to subroutines, as well as the area used to store local variables. ESP points to the last entry pushed on the stack, whereas EBP (the base pointer) is used to point to the first entry pushed on the stack by the current routine. So EBP is higher than ESP.
You can see the address in ESP being indicated by a green arrow in the stack pane (bottom right) in Figure 1. Also, as items are pushed onto the stack, you can see their values appearing in the stack pane and ESP (as indicated by the arrow) moving to point to each new item added in.
The intention of this section is not to teach assembly programming. That is a job for other people (see the References at the end of this paper). However, in order to make best use of the CPU window we will need to know what some commonly encountered instructions mean. To decode others, use an assembly reference, such as one of the aforementioned references.
Bear in mind that many of these assembly instructions can be used with a whole variety of parameter combinations. Those listed in Table 3 are just examples, to give you the general idea. Assembly instructions compile to machine code instructions taking a varying number of bytes from one upwards.
Table 3: Common assembly instructions
| Assembly instruction | Meaning |
| mov eax, 1 | Set EAX to 1 |
| xor eax, eax | Same as mov eax, 0 but more efficient |
| mov eax, esi | Copy ESI value to EAX |
| mov edx, [eax] | Move DWord pointed to by EAX into EDX |
| mov dl, $01 | Set low byte of EDX to 1, leaving other bytes unchanged |
| push eax | Push EAX onto the stack, so EAX can be re-used |
| pop eax | Pop value off stack and store it in EAX |
| ret | Return from routine (return address is on stack) |
| call $410123 | Push address of next instruction on stack and jump to address $410123 |
| mov ebx, [ebp-$5] | Move the DWord starting at the address 5 less than that stored in EBP into EBX |
| cmp dword ptr [ebx+$3C], $00 | Compare the DWord at the address $3C bytes after the address stored in EBX with zero |
| jz SomeRoutine+$A0 | If the last compare operation suggested the two values are equal, jump to $A0 bytes after the first byte of the SomeRoutine routine. Compare operations are implemented as subtractions. JZ is a contraction of Jump if Zero. |
| movsb | Copy byte pointed to by ESI to the address pointed to by EDI, then increments ESI and EDI by 1 (unless direction flag is set, where they are decremented |
| movsw | Copy word pointed to by ESI to the address pointed to by EDI, then increments ESI and EDI by 2 (unless direction flag is set, where they are decremented |
| add esp, -$08 | Subtract 8 from stack pointer |
To successfully use the CPU window, you need to understand how to get the panes to reposition at any given address and how to follow referenced addresses and jumps to their destinations.
To disassemble code at any location, right-click on the disassembly pane and choose Goto Address... (or press Ctrl+G with the disassembly pane active). This brings up an address entry dialog where you can type in a new address value (hexadecimal addresses need the $ prefix) or expression. To move a few bytes down, you could use an expression like EIP+20. Alternatively, if you know that a code address has been loaded into a register you can enter the register name in the dialog.
Note, though, that disassembly has a potential for failure. If you start disassembling halfway through the bytes of one instruction, the subsequent bytes will be interpreted as if they are the start of an instruction. This erroneous translation can propagate through many bytes and give very misleading results. The key problem here is that nothing specifies where a given instruction starts and ends. It all relies on being given a valid starting point, and disassembling from there.
Always consider this if you position the disassembler on a specific location, rather than letting it position itself as instructions are executed.
You can tell the disassembly pane to disassemble from an origin which is one byte later using Shift+Ctrl+→ or one byte earlier with Shift+Ctrl+→.
If you can see a jump instruction in the disassembly pane, you can see where it will take you by clicking on that instruction, then right-clicking and choosing Follow (or pressing Ctrl+F). This is particularly useful when faced with relative jumps, such as those that jump x bytes into a routine, for example: jmp Foo + $7B.
The memory dump pane defaults to displaying information on a byte-by-byte basis. However it can sometimes be useful to see things listed as other types. For example, you often encounter lists of addresses, which are best viewed as DWords. To accomplish this, right click on the memory dump pane and choose Display As | DWords. Other display options include bytes, words, quadwords (8 byte unsigned integers), singles, doubles and extendeds.
A Virtual Method Table (VMT) is a good example of a list of addresses. You can see one being displayed by the memory dump pane (as a list of DWords) in Figure 3. We will see how to home in on a VMT, and what good it can do us later.
Figure 3: Displaying A VMT as a list of DWords
Similar to the disassembly pane, you can tell the memory dump pane to start dumping from a given address (or expression that yields an address) with the context menu's Goto Address... option (Ctrl+G).
You can also tell the memory dump pane to dump from an origin which is one byte later using Shift+Ctrl+← or one byte earlier with Shift+Ctrl+→.
If you see a memory address in the memory dump and you wish to see what is at that location, you have two useful options. If you want to see a dump of the memory starting at that address, you can select the address, right-click on it and choose Follow | Offset to Data (or press Ctrl+D). This is quicker than entering the address it in the memory dump pane's Ctrl+G dialog.
However, if you feel it maybe the address of some code you want to see disassembled, you can select the address, right-click and choose Follow | Near Code (or press Ctrl+E).This is quicker than entering the address in the disassembly pane's Ctrl+G dialog.
Before looking at how a number of simple ObjectPascal constructs appear at the machine level, it is useful to know of a number of potentially useful constants and types in the System unit. If you haven't browsed this unit before, take some time to do so.
Items that we will make use of, or at least refer to, will include the virtual method table entry constants (starting at line 139 in Delphi 6, 94 in Delphi 5 and 131 in Kylix 1) and the internal exception handling frame types (starting at line 1754 in Delphi 6, 4096 in Delphi 5 and 1714 in Kylix 1).
The virtual method table entry constants define positions that precede any given class VMT, which are occupied by pointers to other compiler-generated information, such as the class name and the RTTI table. These constants are all negative, their values specifying how many bytes before the VMT the relevant information can be found. Since these constants are in the interface part of the System unit, they can be used without problem.
Normally, parameters are passed to routines using the stack. The register calling convention, or fastcall calling convention, as it is also known, attempts to be more efficient by passing the first three suitable parameters in CPU registers. Delphi and Kylix use the register calling convention by default. Consequently the first parameter which requires four bytes or less will be passed in EAX, the second in EDX and the third in ECX.
When a method is called, the first parameter passed is actually Self (which obviously is hidden from the programmer), so Self will reside in EAX in a method compiled with the default register calling convention. However, if EAX is used for other purposes, the Self pointer may be pushed onto the stack for a while, as described below.
Parameters and local variables live on the stack. The default calling convention makes the first three suitable parameters get passed in the EAX, EDX and ECX registers as described above, but if any code in the generated routine makes use of any of these registers, they will be stored on the stack as the routine enters. This is also the true if the routine calls other routines or accesses properties, meaning the compiler cannot know whether these registers will be preserved or not.
For example, if you place a breakpoint on the begin line of Listing 1, and view the CPU window, the disassembled code looks like Listing 2. You can see the parameters being stored just below the base pointer. The code corresponding to begin is called a subroutine's prologue code, whereas the code corresponding to the end is called the epilogue code. The prologue and epilogue may include additional code to set up necessary protection constructs, and to tidy away resources that have been consumed in the subroutine's execution.
Listing 1: A simple routine with three 32-bit parameters
procedure Foo(A, B, C: Integer);
begin
  Application.MainForm.Tag := A + B + C;
end;
Listing 2: The prologue code for Listing 1
push ebp           //record old base pointer
mov ebp, esp       //turn current stack pointer into this routine's base pointer
add esp, -$0c      //make space on stack for recording parameters
mov [ebp-$0c], ecx //store 3rd parameter below where 2nd parameter will go
mov [ebp-$08], edx //store 2nd parameter below where 1st parameter will go
mov [ebp-$04], eax //store 1st parameter below base pointer
Local variables are stored directly below the area where parameters are stored (if at all).
Often Delphi and Kylix routines will have much more involved prologue code because strings, dynamic arrays or interface references will be involved.
Strings and dynamic arrays are dynamically managed by code generated by the compiler. It needs to ensure that, regardless of exceptions, allocated string memory will be tidied up appropriately. In the case of interface references the reference count must be decremented before the routine ends, regardless of exception.
The Delphi compiler achieves these goals by inserting custom exception handling frames in the prologue and epilogue. It seems, however, that Kylix achieves its goals in other ways than modifying subroutines' prologue/epilogue code, as the exception handling code discussed in this section does not get generated in Kylix applications.
In the case of strings, exception handling frames are set up whether they are passed as parameters, declared as local variables, or manufactured as a side effect of evaluating an expression such as this one:
ShowMessage( IntToStr( 99 ) );
You can spot an exception frame being set up when the FS segment register is used. Win32 exception frames are recorded on the stack. A pointer to the top of the exception list is stored at byte zero in the FS segment (FS:[0]). FS refers to thread-local storage, so each thread has its own exception frame list. Listing 3 shows the prologue of the same routine from Listing 1, but with a local string variable declared.
Listing 3: The prologue for Listing 1 after adding a local string variable
push ebp                //record old base pointer
mov ebp, esp            //turn current stack pointer into this
                        //routine's base pointer
add esp, -$10           //make space on stack for recording parameters
                        //and string variable pointer
push ebx                //preserve whatever EBX maybe
xor ebx, ebx            //set EBX to 0 (a nil pointer in this case)
mov [ebp-$10], ebx      //store nil in local string variable
                        //(strings are initialised to nil)
mov [ebp-$0c], ecx      //store 3rd param below where 2nd param will go
mov [ebp-$08], edx      //store 2nd param below where 1st param will go
mov [ebp-$04], eax      //store 1st param below base pointer
xor eax, eax            //set EAX to 0
push ebp                //store base pointer on stack
push $0044dbfc          //store address of exception description record
push dword ptr fs:[eax] //store previous top exception frame ptr on stack
mov fs:[eax], esp       //record location of new, topmost, exception record
The FS:[0] value contains an address that points to an exception frame record (a PExcFrame pointer), stored on the stack, containing three DWord fields. Listing 4 shows the TExcFrame record type as can be found in System.pas, Delphi's core RTL unit. The first field contains the address of the next exception frame record, the next contains the address of an exception description record (a TExcDesc record) used in the event of an exception.
Listing 4: Exception frames, as defined in System.pas
JmpInstruction =
packed record
  opCode:   Byte;
  distance: Longint;
end;

TExcDescEntry =
record
  vTable:  Pointer;
  handler: Pointer;
end;

PExcDesc = ^TExcDesc;
TExcDesc =
packed record
  jmp: JmpInstruction;
  case Integer of
  0: (instructions: array [0..0] of Byte);   //try/finally
  1: (cnt: Integer; excTab: array [0..0{cnt-1}] of TExcDescEntry);
       //try/except
end;

PExcFrame = ^TExcFrame;
TExcFrame =
record
  next: PExcFrame;
  desc: PExcDesc;
  hEBP: Pointer;
  case Integer of
  0:  ( );
  1:  ( ConstructedObject: Pointer );
  2:  ( SelfOfMethod: Pointer );
end;
This exception description record contains an address to jump to in case of error (the jmp field, which is a JmpInstruction record containing appropriate opcodes).
It also holds additional information, such as another address to jump to first in the case of a try/finally statement (variant part 0, the instructions field).
The second variant part of TExcDesc contains a list of exception handlers. It starts with an integer field (cnt) indicating how many there are. This is followed by an array of TExcDescEntry records, each of which describes an individual exception handler. A TExcDescEntry record contains a pointer to the specified exception class's Virtual Method Table (the vTable field), and a pointer to the code to execute if exception of that type occurs (the handler field).
The last TExcFrame field contains the value to restore the base pointer to if the exception is handled.
The specific address ($0044DBFC) of the exception description record will vary, but in the case we are working with, you can see the given address a little further down the disassembly pane. The bytes contained within the record are disassembled in red in Listing 5.
Listing 5: Epilogue code of a routine that uses a string
//Auto-generated code to help tidy the string up
xor eax, eax       //Set EAX to 0
pop edx            //Pop old exception frame record address
pop ecx            //Pop exception description record address (no longer needed)
pop ecx            //Pop old EBP (no longer needed)
mov fs:[eax], edx  //Make old exception frame the topmost exception frame
push $0044dc03     //Push new return address on stack (the
                   //corresponding line is shown green)
lea eax, [ebp-$10] //Load address of string into EAX
call @LStrClr      //Pass string address to string clearing routine
ret                //Return to recently pushed return address
jmp @HandleFinally //Jump to finally section handler
jmp Foo + $47      //Jump to finally section (shown in blue)
//Code that corresponds to the end line in the routine
pop ebx            //Pull the preserved EBX off the stack
mov esp, ebp       //Reset the stack pointer to what it was before this routine
pop ebp            //Reset EBP to stored value
ret                //Return to caller
If an exception occurs, the exception description record contains an instruction to jump to the HandleFinally routine. The record also contains a jump instruction that jumps to the finally part of the code, which passes the string address to LStrClr, to free its memory. If no error occurs, the LStrClr call is still made, but the code is set up to jump past the exception description record by a fabricated return (the target address is pushed onto the stack and a ret instruction is made).
So you may well ask how this information can be used. Okay, let's take an example scenario where you have stepped into a subroutine in the CPU window where the prologue code sets up an exception frame for an exception handler, something like Listing 3. Because of the occurrence of the exception description record, which is placed after some later code, and the issue with disassemblers getting confused about where instructions start, the actual exception handling code may not be displayed correctly.
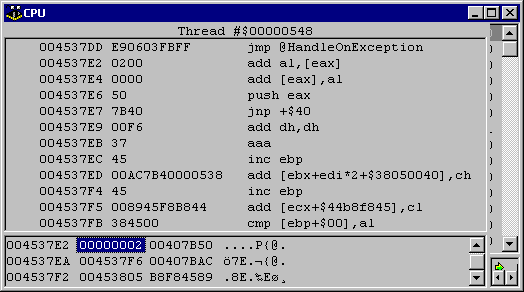
Look at Figure 4 for an example. The Delphi code that generates this machine code is shown in Listing 6. As you can see there are two types of exceptions that can be caught, EConvertError and EAccessViolation. However, the disassembler is having a hard time coping with the exception description record (which you can see starts at address $004537DD).
Listing 6: A simple exception handler that compiles down to Figure 4
procedure TForm1.Button1Click(Sender: TObject);
begin
  try
    Tag := StrToInt(Edit1.Text)
  except
    on E: EConvertError do
      ShowMessage('Bad input');
    on E: EAccessViolation do
      ShowMessage('AV')
  end
end;
Figure 4: Poor disassembly due to a data record embedded in the code
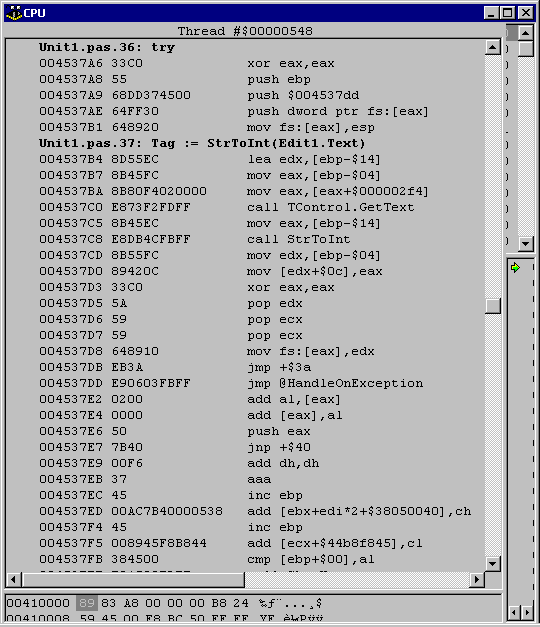
The record contains five bytes that map into a jump to the HandleOnException routine (as can be seen in Figure 4 if you scan down to the specified address). As Listing 4 shows, this jump instruction is followed by another instruction for a try/finally statement, or a four byte count followed by that many TExcDescEntry records for a try/except statement.
Unfortunately, the disassembler does not know the following bytes are not instruction opcodes and so attempts to disassemble them, thereby having a knock-on effect for the disassembly of the real instructions that follow the record.
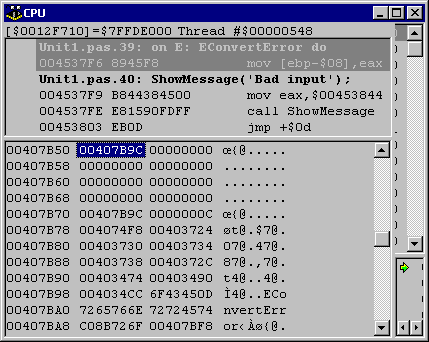
To try and help clear things up and see what should really be going on we should instruct the memory dump pane to dump memory starting from address $004537DD + SizeOf(JmpInstruction) or $004537DD + 5 (using Ctrl+G), in DWord format. Figure 5 shows the result.
You can see the integer value of 2, indicating two TExcDescEntry records to follow, each of which is defined to have two 32-bit pointers (addresses) contained therein. The first one (which we will assume corresponds to the EConvertError handler) has a vTable field of $00407B50 and a handler field of $004537F6, the second one (presumably for EAccessViolation) has a vTable of $00407BAC and a handler of $00453805.
Figure 5: Looking at exception description record fields
Now we need to know what these pointers point to. Let's try the EConvertError description record. The vTable field will point at some data (the exception class's VMT) whilst the handler field points to code. Select the handler value ($4537F6 at address $4537EA) and press Ctrl+E, then select the vTable value ($407B50 at address $4537E6) and press Ctrl+D.
As you can see in Figure 6, this repositions the disassembly origin correctly on the EConvertError handling code which starts at address $454476. This address was actually present in Figure 4, but was interpreted by the disassembler as being in the middle of another instruction.
Figure 6 also shows a memory dump of the EConvertError VMT. Notice that the VMT has the class name stored just after it (we will see this again later).
Figure 6: Seeing the exception handling code hidden from us in Figure 4
So knowledge of how exception handlers are laid out allows you to get an accurate disassembly of the relevant instructions.
This sort of approach can also be useful if you do not have the source for a given subroutine containing some exception handling logic, but wish to know which exceptions are handled by it and what they do. Clearly, the TExcDescEntry records contained within the TExcDesc record generated for a try/except statement allow us to find these things out.
An object reference is a pointer; this much is quite common knowledge to ObjectPascal developers. But what does it point to? In abstract terms it points to an object, but this doesn't really help us understand what is going on.
It can be quite useful here to recall that an object is a collection of code (methods) and data. An object's class defines its data and code. There is no need for code to be duplicated for each individual object instance, so each instance uses the same code. However, each object needs its own set of instance data so, when an object is created, memory is allocated to accommodate all the required data fields. An object reference points to the start of the instance data block.
For any given object's instance data, the first item is a class reference. Class references are variables that can refer to any of a number of related class types. Through a class reference you can call the constructor, without knowing which class will be constructed, as shown in Listing 7.
Listing 7: Use of a class reference
type
  //this type is defined in the VCL, but is shown here for clarity
  TComponentClass = class of TComponent; //this is a class reference type
...
var
  AClass: TComponentClass; //this is a class reference variable
  AnObject: TComponent;
...
AClass := TButton; //set the class reference to some component class
AnObject := AClass.Create(Self); //construct an instance of the chosen class
if AnObject is TControl then
  TControl(AnObject).Parent := Self
A class reference is also a pointer. It points to the start of the VMT (in other words it points to the VMT's first entry). For example, in a simple application with (amongst other things) a button (Button1) on a form, let's suppose a breakpoint is placed in one of the event handlers. When the breakpoint triggers and the debugger takes control, you open the CPU window and wish to investigate the internals of the button.
To do this you can select the memory dump pane, press Ctrl+G and enter the symbol Button1 and press Enter, or find a reference to Button1 in the editor, highlight the word and drag it onto the memory dump pane (this dragging option was introduced in Delphi 5). Either of these steps will make the memory dump show you the address at where the Button1 object reference field is stored, which means it will show you the portion of the form instance data containing the Button1 object reference.
In my test case, the memory dump pane's origin is $BB1938 (this is the address that is shown if you add a watch on the expression @Button1). The DWord value at this address (the value of the object reference) is $BF3270, meaning that the instance data for Button1 starts at $BF3270. Assuming this value is selected, pressing Ctrl+D repositions the memory dump to start at that address, thereby showing the button's instance data.
The first DWord in the instance data (at address $BF3270) will be the class reference pointer, shown as $426CC0 in my case. Pressing Ctrl+D when this value is selected will de-reference the class reference pointer and display the VMT of the object's class, which in this case is TButton and starts at address $426CC0.
As well as using the class reference found in an object's instance data you can also take advantage of a number of global class reference variables that exist in the process at run-time. Pressing Ctrl+G and entering TButton will take you to a memory location that holds a class reference for TButton. Pressing Ctrl+D will then take you into the VMT.
As a further shortcut, entering Pointer(TButton)^ or even Integer(TButton) + 0 in the Ctrl+G dialog will take you straight to the TButton VMT.
A VMT is easy to recognise as it typically has a list of virtual method addresses in it. If the memory dump pane is displaying DWords, these will all be very similar values, often not very far from the base address for the whole process, which is $400,000 in Windows, and typically somewhere over $8,000,000 in Linux.
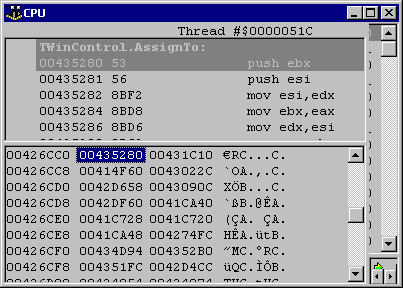
You can follow any of the VMT entries by selecting them and pressing Ctrl+E. For example, Figure 7 shows the TButton VMT after pressing Ctrl+E for the first entry. You can see that this entry corresponds to the AssignTo virtual method, which is implemented in TWinControl.
Figure 7: Looking at the VMT of TButton
You should note that not all classes have their own virtual methods over and above those defined in TObject (Exception is one such example). In these cases, there is still a VMT, but with no method addresses in the traditional way. Instead it is solely present for the VMT prefix fields as discussed below.
The VMT contains the address of methods declared with the virtual directive, or such methods overridden with the override directive. This does not include those defined in TObject (SafeCallException, AfterConstruction, BeforeDestruction, Dispatch, DefaultHandler, NewInstance, FreeInstance and the destructor Destroy) which have special locations residing before the VMT.
In fact the VMT is prefixed with many special fields including the pointer to the class RTTI, the pointer to the published field table, the pointer to the published method table, and so on. As a convenience, the System unit defines a number of constants defined to represent each of these fields in terms of their relative offsets from the VMT start, as mentioned earlier. A full list of them is given in Table 4.
Table 4: VMT prefix field constants
| Constant name | Offset | Purpose |
| vmtSelfPtr | -76 | Address of first VMT entry if any, or of class name |
| vmtIntfTable | -72 | Address of implemented interface table |
| vmtAutoTable | -68 | Address of automated class section (Delphi 2) |
| vmtInitTable | -64 | Address of table of fields requiring initialisation |
| vmtTypeInfo | -60 | Address of RTTI |
| vmtFieldTable | -56 | Address of published field table |
| vmtMethodTable | -52 | Address of published method table |
| vmtDynamicTable | -48 | Address of DMT |
| vmtClassName | -44 | Address of class name string |
| vmtInstanceSize | -40 | Number of bytes of instance data required by object |
| vmtParent | -36 | Address of ancestor class VMT |
| vmtSafeCallException | -32 | Address of virtual method, SafeCallException |
| vmtAfterConstruction | -28 | Address of virtual method, AfterConstruction |
| vmtBeforeDestruction | -24 | Address of virtual method, BeforeDestruction |
| vmtDispatch | -20 | Address of virtual method, Dispatch |
| vmtDefaultHandler | -16 | Address of virtual method, DefaultHandler |
| vmtNewInstance | -12 | Address of virtual method, NewInstance |
| vmtFreeInstance | -8 | Address of virtual method, FreeInstance |
| vmtDestroy | -4 | Address of virtual destructor, Destroy |
So, for example, this is how we can be taken to the implementation of the TButton destructor. Using the address we found before, press Ctrl+G in the memory dump pane, enter $426CC0 + vmtDestroy, press OK, then press Ctrl+E. The disassembly pane will then show the destructor (which for a VCL button is TWinControl.Destroy, and for a CLX button in Delphi or Kylix is TWidgetControl.Destroy).
Note that, as discussed earlier, you can directly locate the VMT by appropriate use of the class type in the Ctrl+G dialog. So instead of $426CC0 + vmtDestroy, you could alternatively use Integer(TButton) + vmtDestroy. This requires more typing, but requires less exploration to find correct addresses.
If you have the Debug DCUs compiler option enabled, you will have easy access to the VCL source code. Click on the first destructor instruction in the dissassembly pane and then select View Source from the right-click menu (or press Ctrl+V) to load the relevant source file and locate the corresponding source line for you. The Debug DCUs option was added in Delphi 5 and Kylix 1 to the Compiler page of the project options dialog.
You can recognise virtual method calls as they take the form:
mov reg, VMT start
call dword ptr [reg + VMT offset]
For example, a simple call to Button1.Invalidate in an event handler expands to the assembly instructions in Listing 8. The VMT offset specified for Invalidate is $7C bytes. The first entry is at offset 0, the second at offset 4, the third at offset 8 and so on. So the entry is given by (Offset / 4) + 1, which makes Invalidate the 32nd entry in the TButton VMT.
Listing 8: Calling a virtual method
mov eax, [ebp-$04] //Reload Self from the stack
mov eax, [eax+$000002f0] //Load Button1's object reference into EAX
mov edx, [eax] //Load TButton VMT pointer into EDX
call dword ptr [edx+$7C] //Call address $7C bytes into TButton VMT
You can recognise a dynamic method call as it matches this standard pattern, where reg16 might be BX or SI, for example:
mov eax, object reference
mov reg16, dynamic method index
call @CallDynaInst
For example, a call to a button's Click method is translated to a dynamic method index $FFEB in Delphi 6 and $FFEA in Kylix 1.
All classes have their class names stored as a short string just after their VMT. The actual address is stored in a field shortly before the VMT, as indicated by the vmtClassName constant. If you have access to an object reference, you can follow it through to the VMT, access the address field before the VMT, follow that address and you will see the class name.
Alternatively, you can just look at a memory dump of the VMT and scroll downwards. You will see the class name before long (see Figure 6).
If you have an object reference in EAX, entering PInteger(EAX)^ + vmtClassName in the Ctrl+G dialog will show you the address where the class name is stored. Pressing Ctrl+D takes you to the class name.
When the Delphi 32-bit memory manager allocates a block of memory, it comes via a suballocator. This does not apply in Kylix, as the Libc memory manager is used directly there. The Windows memory allocator isn't really set up for lots of small memory allocations, but the Linux memory manager is.
You can find the Delphi suballocator source, formatted with very little consideration for easy-to-read indentation, in the GetMem.Inc file in the RTL\SYS subdirectory under Delphi's Source directory.
The suballocator allocates large blocks of memory from the Windows heap using Windows heap allocation routines. As RTL memory allocation routines are called, it divides it into appropriately sized chunks of memory and returns them, which is where the term suballocator comes from.
The suballocator records additional information in a set of four bytes before the allocated block. Primarily, the information recorded is the size of the allocated block, giving potentially a maximum size of 4Gb-1, although the size value is an integer, so in fact you have a maximum of 2Gb-1. The high bit should therefore be ignored. A binary and operation against $7FFFFFFF will strip off the high bit.
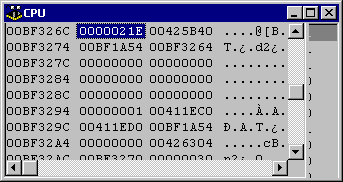
If you have a pointer to any block of memory allocated through the Delphi RTL (not directly through Windows API calls) you can readily find out how large it is. Suppose you have an address in EAX, such as an object reference. Recall that an object reference is a pointer to memory allocated to hold instance data. Enable the memory dump pane, ensure it is displaying DWords, press Ctrl+G and enter EAX-4.
This will dump the memory starting four bytes before the address held in EAX, and so show the heap block prefix DWord, followed by the object's instance data. The first DWord of instance data will be the address of the VMT (the class reference). The memory dump pane will look like Figure 8. You can see it has a value of $21E.
Figure 8: Looking at a heap block's prefix DWord
One little known aspect of the suballocator is that it always rounds memory block sizes up to the nearest four bytes, so in order to calculate the size of the block, it is necessary to mask off the lowest 2 bits (as well as the high bit, as mentioned above). A binary and operation with $7FFFFFFC will do this. $21E and $7FFFFFFC gives $21C.
This represents the size of the button's instance data plus the size of the prefix DWord. The implication here is that the button has $218 bytes of instance data ($21C - SizeOf(DWord)).
If you follow the VMT pointer and use the vmtInstanceSize offset pointer (or just enter Integer(TButton)+vmtInstanceSize in the Ctrl+G dialog), you will find that the class claims to require $218 bytes of instance data, which is true.
You can easily find out if a block of memory in a Delphi application is still considered valid or has in fact been freed. It was mentioned that heap sizes are rounded up to the nearest four bytes, which leaves two spare bits. These bits are used to store internal information for the heap suballocator.
The least significant bit (LSB), bit 0, is of little interest to us here, but is set if the previous heap block is free, meaning the heap suballocator can validly merge that block and this one together at some point. Bit 1 indicates if the block is free or in use; it is in use if the bit is set.
Whenever you need to see if a block of memory is in use or has been freed, read the four bytes before the block and see if bit 1 is set. You can do this by performing an and operation between the value and 2. If you get a non-zero value (2) back, the block is in use. A manual way of checking would be to see if the last hexadecimal digit of the value is any of these values: 2, 3, 6, 7, A, B, E or F. If it is, the block is in use, otherwise the block is free.
Unfortunately, (as I have recently learnt), the pertinent bit is never cleared by the heap manager in any version of Delphi up to version 6, so the results of the test are ultimately meaningless until the bug is fixed.
Whilst Kylix directly uses the Linux memory manager, there is a debug facility available for this job if you are prepared to recompile the RTL. Borland provide a GNU makefile in Kylix's source/rtl directory, set up to recompile the RTL in a manner suitable for writing GPL applications.
Navigate to the directory and execute the following statements, ensuring you have rights to create directories and files in the Kylix directory tree:
export DCCSYSSWTS=-DDEBUG
make debug
This recompiles the RTL with the DEBUG conditional symbol defined, changing the memory allocation/deallocation code slightly so that an extra four bytes are allocated for each requested memory allocation, and ensures debug info is generated for the newly compiled RTL units. These units will be under the Kylix root directory in units/debug, so make sure you add $(Delphi)/units/debug to the beginning of your unit search path in the Directories/Conditionals page of the project options dialog.
This four byte block precedes the address returned to the caller, and can be used to identify if a block of memory is really free. When the memory is allocated, the prefix block is set to 0. When the memory is freed, a value of $FBEEFBEE is written to the prefix block just before freeing it. If you are using a block of memory, and the 4 bytes prior to it contain this value, you know you are working with memory that has already been freed.
The Delphi suballocator code comes complete with a heap status checking function called GetHeapStatus. This returns a record of information about your application's heap usage, including an error code. Regular checking of GetHeapStatus.ErrorCode can alert you to a heap corruption problem.
The possible error values that may be returned are defined as constants in the suballocator source, GetMem.Inc.
Listing 9: Delphi heap status error codes
// Heap error codes
const
  cHeapOk           = 0;  // everything's fine
  cReleaseErr       = 1;  // operating system returned an error when we released
  cDecommitErr      = 2;  // operating system returned an error when we decommited
  cBadCommittedList = 3;  // list of committed blocks looks bad
  cBadFiller1       = 4;  // filler block is bad
  cBadFiller2       = 5;  // filler block is bad
  cBadFiller3       = 6;  // filler block is bad
  cBadCurAlloc      = 7;  // current allocation zone is bad
  cCantInit         = 8;  // couldn't initialize
  cBadUsedBlock     = 9;  // used block looks bad
  cBadPrevBlock     = 10; // prev block before a used block is bad
  cBadNextBlock     = 11; // next block after a used block is bad
  cBadFreeList      = 12; // free list is bad
  cBadFreeBlock     = 13; // free block is bad
  cBadBalance       = 14; // free list doesn't correspond to blocks marked free
If you are concerned with memory corruption issues, you can link the Linux Electric Fence library with your program. Electric Fence (available from ftp://ftp.perens.com/pub/ElectricFence) replaces the default Linux memory manager with one that uses hardware protection to perform stringent checking of your application's memory use, flagging any problems relating to memory buffer overruns or underruns, for example.
To use Electric Fence, you will need to recompile the RTL with the EFENCE conditional symbol defined and modify your search path, as explained earlier. This is straightforward; ensure you have rights in the Kylix directory tree and execute these statements:
export DCCSYSSWTS=-DEFENCE
make debug
If you need both the DEBUG and EFENCE symbol defined, then separate them with a colon:
export DCCSYSSWTS=-DEFENCE:DEBUG
make debug
Sometimes when debugging, you will find a variable is irritatingly unavailable just when you want to check its value. This problem is exaggerated with optimisation turned on.
A common way around the problem is to pass the variable to a helper routine at various points in the code. Such a helper routine should take a single untyped var parameter, but should do absolutely nothing (see Listing 10). Any variable can therefore be passed to the parameter and the compiler will have little choice but to keep it available.
Listing 10: A routine to help keep variables alive
procedure Touch(var X);
begin
end;
Bear in mind that Inprise R&D recommend not relying on this approach working forever, as the compiler might one day be made smart enough to notice that the routine does nothing, and so not call it. This would re-introduce the same scope problem.
Most times an Access Violation occurs in the debugger, by the time the debugger pops up and announces it to you, having suspended your program, you are not in the offending routine's scope. This means that when you try and evaluate your variables, the debugger claims not to understand what you mean.
This typically happens when the actual problem occurs in the implementation of a routine you do not have source for, called by your routine.
One way of helping out here is to add in helper handlers. These are exception handling constructs which do not actually perform any exception handling per se, but instead simply cause an exception handling frame to be added into the subroutine (see Listing 11).
Consequently when an Access Violation occurs in the routine at some point, your helper handler will pick up the problem and so your routine will be in the current scope. This means you can evaluate expressions based in this subroutine.
Listing 11: Helper Handlers
try
  //code that you suspect may induce an AV
except
  raise
end
...
try
  //code that you suspect may induce an AV
finally
end;
This may not be an entirely practical suggestion, but it is very possible to re-execute one or more machine instructions. All you need to do is change the value of EIP in the CPU registers pane, giving it a value corresponding to the start of an already executed instruction.
You should take care when doing this to ensure that the repeated execution of a statement does not cause the stack to get in a muddle, or problems will ensue. Another possible problem would be caused by resetting EIP in the middle of a for loop, which can cause the loop counter to be incremented in unexpected ways. The implementation of the for loop at machine level, particularly when optimisations are enabled, is often done in a surprising fashion.
In general, you should try to reset EIP to point to the start of a source line, as registers tend to be reloaded for each source line due to the way the compiler generates machine code.
Try using the event log window (View | Debug Windows | Event Log) to help when debugging Windows applications. You can call OutputDebugString, which takes one PChar parameter, and the text passed will be added to the event log, so it can be used as an execution trace. A nice implementation point of OutputDebugString is that if your program is not running within a debugger, it does absolutely nothing, returning immediately.
Note that in Kylix, there is no direct equivalent of OutputDebugString that sends messages to the event log. Instead, you can call the Libc routine syslog, which takes two parameters. The first parameter is made up of flags (you can pass LOG_USER or LOG_INFO) and the second parameter is the text you wish to log, declared as a PChar. syslog sends its output to the system log file, which is usually /var/log/messages.
You can also make use of the event log in both Delphi and Kylix by setting advanced breakpoint properties. Breakpoints do not necessarily have to break the execution of your program. They can evaluate expressions and (optionally) add the result to the event log. They can also enable or disable whole groups of other breakpoints, thereby turning on or off other trace/break options that you set up. These advanced breakpoint properties were introduced in Delphi 5.
In a 75 minute conference talk, we are unable to go too deep, but you should be starting to see the power available when using the CPU window. Hopefully, after hearing or reading this paper you will feel confident enough to start experimenting with it on your own.
Brian Long used to work at Borland UK, performing a number of duties including Technical Support on all the programming tools. Since leaving in 1995, Brian has spent the intervening years as a trainer, trouble-shooter and mentor focusing on the use of the C#, Delphi and C++ languages, and of the Win32 and .NET platforms. In his spare time Brian actively researches and employs strategies for the convenient identification, isolation and removal of malware. If you need training in these areas or need solutions to problems you have with them, please get in touch or visit Brian's Web site.
Brian authored a Borland Pascal problem-solving book in 1994 and occasionally acts as a Technical Editor for Wiley (previously Sybex); he was the Technical Editor for Mastering Delphi 7 and Mastering Delphi 2005 and also contributed a chapter to Delphi for .NET Developer Guide. Brian is a regular columnist in The Delphi Magazine and has had numerous articles published in Developer's Review, Computing, Delphi Developer's Journal and EXE Magazine. He was nominated for the Spirit of Delphi award in 2000.