

This month Brian Long looks at simple animation.
This article first appeared in Linux Format Issue 29, July 2002.
Click here to download the files associated with this article.
If you find this article useful then please consider making a donation. It will be appreciated however big or small it might be and will encourage Brian to continue researching and writing about interesting subjects in the future.
Last month we saw some simple graphics using the TCanvas class. This month we are moving on a little to see how we can achieve some simple animation effects in Kylix applications.
As was the case last month, the goal here is not to make a start on a professional graphics/animation package but more to introduce you to some techniques you can use to achieve some pleasing effects in your Kylix applications. Hopefully, Kylix developers can use these ideas as starting points that will lead to more interesting programs.
The goal this month is to get something akin to a sprite that we can move around the form.
Let's get some basics out of the way first. As with last time, we must use a background bitmap to build up the scene that we want on the form, rather than drawing it directly onto the form's canvas. This process is usually called double buffering and is commonplace in most forms of graphics application.
In fact more than that, we will probably need two background bitmaps, bearing in mind we need to move a sprite around. One bitmap can hold the intact, original rendering of the background while the other will be used to build up the scene to go on the form. Each time we need to move the sprite, we can start by copying the intact background onto the scene bitmap and then draw the sprite on top of it.
The first challenge we should consider is how to copy a non-rectangular image onto a bitmap. The normal canvas methods available seem to work on the basis of a rectangular region to copy from or to. Of course this is because a rectangle is a simple shape to describe, but when dealing with sprites the images are rarely rectangular.
We need to know how to treat various pixels in a rectangular region as transparent so that when we copy the image, only the relevant pixels make it to the destination bitmap and the background pixels are "lost" en route.
This sort of technique is commonplace in animation and can be achieved using a mask. We'll use an example of drawing an image of a sun on a form that has a coloured image drawn across its background to show the idea. The simple project SunDemo.dpr consists of a form with an image component stretched across its background displaying a colourful bitmap. When you click on the form background a sun will be drawn with its top left at that point.
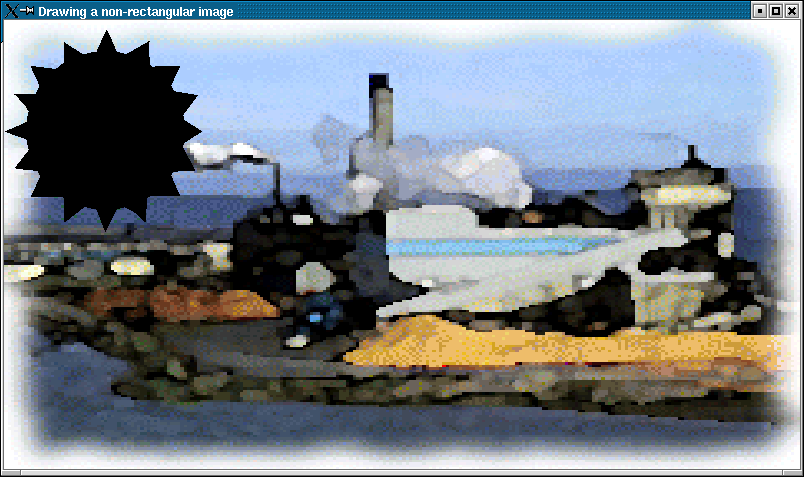
The general plan involves using two bitmaps for each sprite, the image and its mask. The mask has a white background and each pixel of the actual picture is coloured black (Figure 1). It is drawn on the destination using the AND operator (the value of the destination and mask pixels are combined with a binary AND), resulting in a black representation of the target image being left on the destination.
Figure 1: Mask for an image of the sun
The demo form contains a non-visible image containing the sun image mask. When the user clicks on the form (well, actually the image on the form) this code sets the appropriate copy mode (how each pixel is copied/merged from the source to the destination) and draws the bitmap represented by the image component onto the form's canvas. The result is shown in Figure 2.
|
The sun image itself has a black background (Figure 3) and is drawn on the destination with the OR operator. This lets the colour pixels go into the black masked area.

An additional image component is used to hold the sun image and the following code draws it on the form.
|
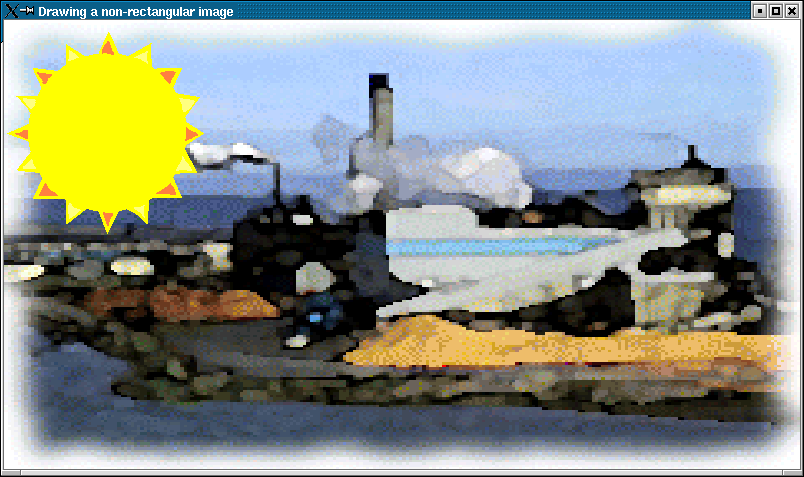
The result of these two steps is just what is needed - the image is drawn, but its surrounding background obliterating any of the image on the form (see Figure 4).
Figure 4: The final non-rectangular sun image
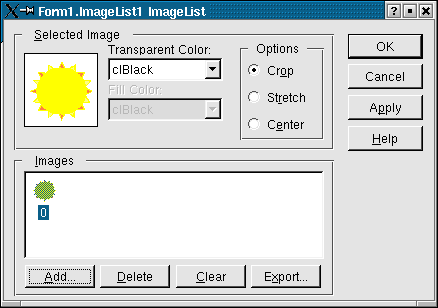
Whilst this process is reasonably straightforward, it can be tedious when you have many sprites to deal with. Things can be simplified somewhat by using an image list component (from the Common Controls page of the Component Palette). You can set the Width and Height properties of this to the dimensions of your sprites and then add them at design-time (using a component editor you get by double-clicking the component) or in code. The design-time editor lets you add pictures and automatically works out which colour should be considered transparent by examining the bottom left pixel (see Figure 5).
Figure 5: Adding masked images to an image list
The image list has a Masked property that defaults to True indicating that a mask will automatically be generated and used when drawing the images. The same non-rectangular image can now be drawn with this simpler single statement (used in the project SunDemo2.dpr) instead of the previous four statements:
|
Now we can press on and get things moving (literally). Our first animation demo can be found in SunAnimation.dpr and uses the tiled Union Jack background from last month. When the application starts running the sun image can be seen in the top left of the form.
Let's have a look at some of the code that gets this working. This is the form's OnCreate event handler.
|
BkGnd is a bitmap used to build up each new scene to be displayed on the form and IntactBkGnd is the intact background bitmap. The SetupBackground method uses the code from last month to produce the tiled background on both BkGnd and IntactBkGnd. The next step is to draw the sun in the default position of (0, 0) - the top left of the form and then enable a timer.
Generally the MoveSun method is used to alter the record of the sun's position before calling DrawSun, but when the program starts the call to DrawSun uses the start position.
|
DrawSun draws the sun on the background and returns the rectangular area occupied by it (we'll see why later). When the form finishes initialising and draws itself for the very first time the OnPaint event will be triggered, which copies the background bitmap onto the form:
|
This particular application does no automatic movement of the image, but instead relies on the user pressing the cursor keys to control its position. The timer that was enabled earlier by the OnCreate event handler has an OnTimer event that is used to check for the keystrokes of interest at regular intervals. See the keystrokes appendices for more details about checking for keystrokes in this type of application and for the code to the IsKeyDown helper routine.
|
If any of the four cursor keys are down when the timer ticks then the X and Y variables are updated. Because the checks are not exclusive this allows diagonal movement (for example if the down and right cursor keys are pressed). Once we know how the sun should be moved the MoveSun method is called with X and Y passed as parameters.
|
As the sun is being moved, the previous image needs to be erased. The first thing MoveSun does is to set up the previous sun image rectangle as the return value. Next it updates the current sun position TPoint record and then copies a section from the intact background to cover up the old sun in the background image.
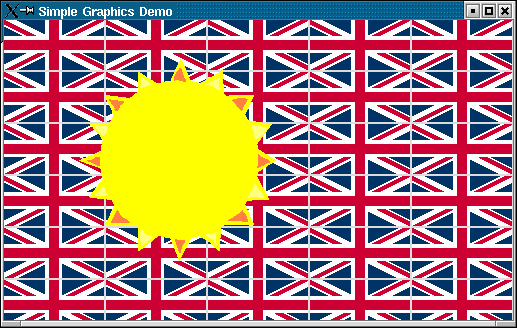
Going back to the OnTimer event handler, the rectangle of the old sun is recorded in the EraseRect variable, whilst the area covered by the new sun (returned from DrawSun) is then stored in the DrawRect variable. Since the sun only moves 5 pixels in any direction (as per the XInc and YInc constants in the timer event handler) the EraseRect and DrawRect rectangles will always overlap to a large extent. To avoid drawing a large area twice a new rectangle is calculated from the union of both these rectangles - this tells us the area on the form that needs updating to reflect the changes made by moving the sun. An appropriate chunk of the background image is then copied to the form so the user sees the sun move. You can see a snapshot of the running application in Figure 6.
Figure 6: The sun and the Union Jack - our first animation program!
Note that our original prototype of this code didn't use this minimalist copying approach. Instead, the original code looked like this:
|
This removed the old sun, drew a new one and then told the form to redraw itself (in its entirety). The problem with doing this very regularly (the timer event triggers one hundred times a second for responsiveness) is that it gets unacceptably "flickery". It is always wise to try and do as little onscreen updating as you can get away with to ensure the application doesn't lose performance unnecessarily.
Another animation demo can be found on the disk called SunAnimation2.dpr. This version differs from the previous one in that it has no keyboard response built in. Instead the sun constantly moves around the form of its own accord, bouncing off the edges of the form when it encounters them, like a simple bouncing ball.
In fact the project source is almost identical to the previous one; the only differences are found in the OnTimer event handler and the MoveSun method.
|
The timer has no need to check any keys - it just moves and draws the sun each time its event triggers. MoveSun uses a couple of variables to decide which direction to move the sun in. When one of its edges hits an edge of the form the pertinent direction is changed so it appears to bounce off.
It involves only simple code changes but gives a nice effect - we like watching the sun bouncing around the form :-)
When developing a normal GUI application in Kylix it is typical to respond to key presses using the OnKeyDown, OnKeyUp and OnKeyPress events. If the user presses a key on the keyboard, the OnKeyDown event fires for the key; if they keep the key down long enough without releasing it (half a second or so) the auto-repeat nature of the keyboard will cause additional OnKeyDown events to occur periodically. When the key is eventually released an OnKeyUp event is triggered for the key.
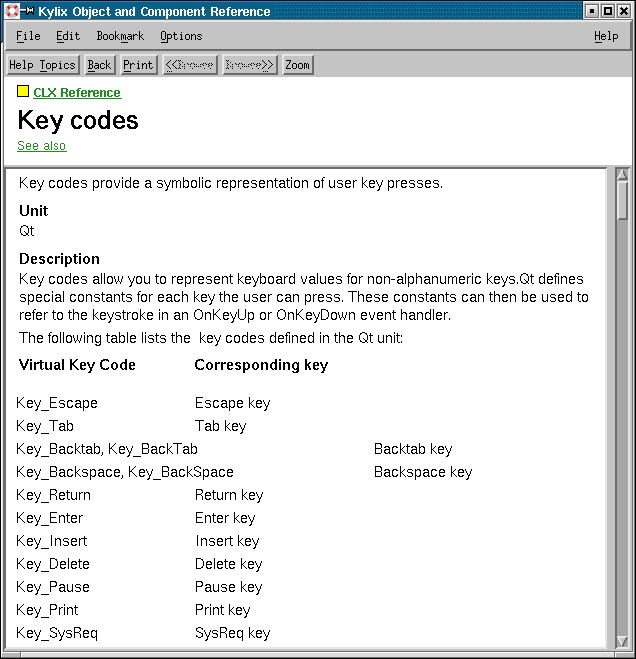
Note that these two events are related to physical keys on the keyboard as opposed to characters. They are triggered for every key that is understood by the X environment. Each event is passed a key code indicating which physical key was pressed or released. Constants for these are defined in the Qt unit and you can find them listed in the help by looking up key codes (see Figure 7).
Figure 7: Key code constants for use in OnKeyDown/OnKeyUp event handlers
In the case of keys that happen to generate characters the OnKeyDown event is immediately followed by the OnKeyPress event which is passed a Char parameter indicating which character was generated.
For example if a user presses Shift+P (to get an uppercase letter P) the events triggered by the control with focus would be:
Most controls have these events but the form can usurp them all if needed with events of its own, which are triggered in advance of those of the active control by setting the KeyPreview property to True. This allows the form to filter various keystrokes that are of form-wide interest.
Keystroke filtering is achieved by modifying the Key parameter in the event handler (either of the form or the control). Setting it to 0 (in OnKeyDown/OnKeyUp) or #0 (in OnKeyPress) means the active control will not see the key event. As a simple example a listbox component could ignore all up arrow presses with this:
|
You can see that there is another parameter, Shift, of type TShiftState that is also passed to each of these events. This is a set that indicates whether any of the Shift, Ctrl or Alt modifiers are being pressed. For example, if you wanted to prevent an edit control from seeing the keystrokes Shift+X you might write an event handler like this:
|
These events work fine for typical X applications, but games require different keyboard handling. When a sprite is moved in response to a key being pressed it needs to move reactively and smoothly. As soon as the key is pressed it should start moving and stay moving until the key is released. The OnKeyDown/OnKeyPress events work via auto-repeat and so only trigger every half second or so, which doesn't do the job.
For cases like these you need a timer triggering its OnTimer event very regularly (or else just a loop that keeps executing throughout the game) and there you need to be able to check the state of any given key at that specific moment.
The Xlib programming API (accessible through the Xlib unit in the Kylix RTL) allows you to examine the state of all keys at any given time with a couple of calls. The main one is XQueryKeymap but that can only be used after opening a connection to the X server with XOpenDisplay (which requires you to call XCloseDisplay after).
Kylix doesn't come with low level X programming documentation but you should be able to find help on these routines with a quick Internet search (one useful Xlib documentation site can be found at http://tronche.com/gui/x/xlib/function-index.html).
The problem we encountered here (due to limited X knowledge) was the specific of what XQueryKeymap tells you. The documentation states it returns an array of bytes (a TXQueryKeymap) that identifies which keys are pressed down, each bit representing an individual key. However it says no more on the subject; no mention of how the bits relate to keys on the keyboard.
After some investigation we found that the bit position of each key corresponds to its X key code (which may be different on different systems). The key code for a given key can be calculated by passing its keysym to the XKeysymToKeycode X API. A keysym (key symbol) is a system-independent way of identifying any key on any keyboard and the Xlib unit defines constants for them all. Examples are XK_Tab (the Tab key), XK_Right (the right cursor key) and XK_F1 (the F1 key).
The following shows a helper routine from the XKeyHelper unit (on this month's disk), which checks the state of a specified key. It takes a keysym, which is translated into an appropriate key code for the current X session. The current keymap is then obtained and the key code is used to extract the bit that relates to the requested key. If the bit is set the key is down.
|
Note that there are no calls to XOpenDisplay or XCloseDisplay in the code as the CLX library makes a connection to the default X server available through its Display property.
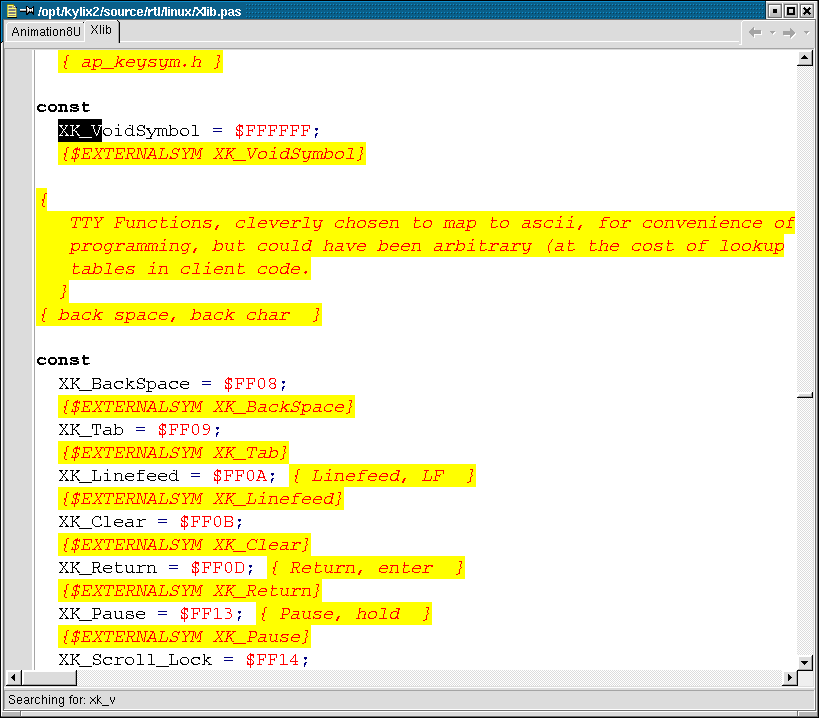
If you need to see the list of available keysyms you can find them easily by following these instructions:
You won't need to type much before the editor locates the first of the keysyms as you can see in Figure 8.
Figure 8: Locating the keysyms in the Xlib unit
As you can see, moving images around a form even with an uneven background, is reasonably straightforward. You can adapt this code and generalise it to allow control of multiple sprites, for example in a game scenario.
Next month we'll look at more useful Kylix techniques. In the meantime, if there is something about Kylix Open Edition you want to see covered here, drop us an email and we'll try our best to incorporate it into a future instalment.
Brian Long used to work at Borland UK, performing a number of duties including Technical Support on all the programming tools. Since leaving in 1995, Brian has spent the intervening years as a trainer, trouble-shooter and mentor focusing on the use of the C#, Delphi and C++ languages, and of the Win32 and .NET platforms. In his spare time Brian actively researches and employs strategies for the convenient identification, isolation and removal of malware.
If you need training in these areas or need solutions to problems you have with them, please get in touch or visit Brian's Web site.
Brian authored a Borland Pascal problem-solving book in 1994 and occasionally acts as a Technical Editor for Wiley (previously Sybex); he was the Technical Editor for
Mastering Delphi 7
and
Mastering Delphi 2005
and also contributed a chapter to Delphi for .NET Developer Guide
.
Brian is a regular columnist in The
Delphi Magazine and has had numerous articles published in Developer's Review,
Computing, Delphi Developer's Journal
and EXE Magazine. He was nominated for the Spirit
of Delphi 2000 award.