Using C# to Develop for iPhone, iPod Touch and iPad
Brian Long Consultancy & Training Services
Ltd.
March 2011
Accompanying source files available through this
download link
Page selection: Previous◄ ►Next
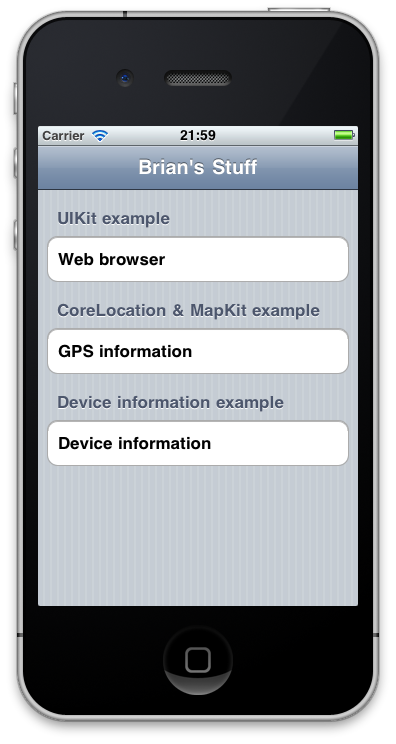
Letís start another iPhone Navigation-based project. This time weíll focus more
on the navigation support than the table support; the table view will simply act
as a menu for some other pages. The menu will contain three items and, just to show
how menu items can be grouped, weíll have some sections in the list/menu. In this
case each item will be in its own section, so three sections, but it is down to
your application's requirements how you apportion list items within the sections.
Make the NumberOfSections() method return 3 and RowsInSection()
return 1 and then add in a TitleForHeader() method as above (entering
override and choose from the list). This should be implemented thus:
public override string TitleForHeader(UITableView tableView, int section)
{
switch (section)
{
case 0:
return "UIKit Example";
case 1:
return "CoreLocation & MapKit example";
default:
return "Device information example";
}
}
The different sections of the menu offer different choices that will exemplify different
parts of the CocoaTouch library. To populate the table cells (or menu items) we
need to add code to GetCell() as before. This time, though, we know
we will only have a small number of cells in the list and so the reusable cell facility
described earlier is not required:
public override UITableViewCell GetCell(UITableView tableView, MonoTouch.Foundation.NSIndexPath indexPath)
{
var cell = new UITableViewCell(UITableViewCellStyle.Default, "");
if ((indexPath.Section == 0) && (indexPath.Row == 0))
cell.TextLabel.Text = "Web browser";
if ((indexPath.Section == 1) && (indexPath.Row == 0))
cell.TextLabel.Text = "GPS information";
if ((indexPath.Section == 2) && (indexPath.Row == 0))
cell.TextLabel.Text = "Device information";
return cell;
}
To give us somewhere to implement these examples we require 3 additional pages.
You can add a new file to the solutionís active project either using File, New,
File from the main menu (or
 N
N)
or by right-clicking your project in the Solution window and choose Add, New File...
Either way, click on iPhone and iPad in the dialog that pops up and choose iPhone
View with Controller. The first one should be called BrowserPage, then
do the same and add GPSPage and finally add a last page called InfoPage.
Each of these new files contains a UIViewController descendant named
as you specified the file should be named. When you choose an item from the table
view weíll launch one of these new views so before leaving RootViewController.xib.cs
we should fill in the RowSelected() method.
public override void RowSelected(UITableView tableView, MonoTouch.Foundation.NSIndexPath indexPath)
{
if ((indexPath.Section == 0) && (indexPath.Row == 0))
controller.NavigationController.PushViewController(new BrowserPage(), true);
if ((indexPath.Section == 1) && (indexPath.Row == 0))
controller.NavigationController.PushViewController(new GPSPage(), true);
if ((indexPath.Section == 2) && (indexPath.Row == 0))
controller.NavigationController.PushViewController(new InfoPage(), true);
}
As you can see, the navigation controller can have a new view controller pushed
onto its stack of view controllers. This new view controllerís view is displayed
and the navigation bar will contain a button that takes you back to the previous
page making return navigation straightforward.
Finally, to edit the Navigation Barís text, double-click MainWindow.xib, ensure
you can see the Navigation Controller (double-click it in the Document Window if
need be) and then you can edit the Navigation Bar text by double-clicking it. Add
in any text; the sample project simply says: Brianís Stuff.
You can also open up RootViewController.xib and set the Table View's Style to Grouped
to enhance the appearance.

Note: back in the example program that used SQLite we put setup
and teardown code in ViewDidLoad() and ViewDidUnload()
respectively. This was fine as there was just the one view that was loaded into
memory as the application started, and unloaded whenever the view is removed from
memory, such as when the application exits or when memory gets low. In this application
there is a menu view and then three secondary views, each of which may require setup
and teardown code. Certainly when each view is first opened the ViewDidLoad()
code will execute but when you navigate back to the menu ViewDidUnload()
will not execute. Similarly when you go back to the same secondary view ViewDidLoad()
will not execute again as it will still be loaded in memory.
It is important to decide whether the teardown code is important to execute as soon
as the view is no longer visible (for performance reasons, for example) or whether
it is okay to leave it until the view is eventually removed from memory. This will
dictate whether you should continue to use the ViewDidLoad()/ViewDidUnload()
methods or maybe switch to the ViewDidAppear()/ViewDidDisappear()
methods.
Go back to the top of this page
Go back to start of this article
Previous page
Next page
 N
N
